Thursday, 17 November 2011
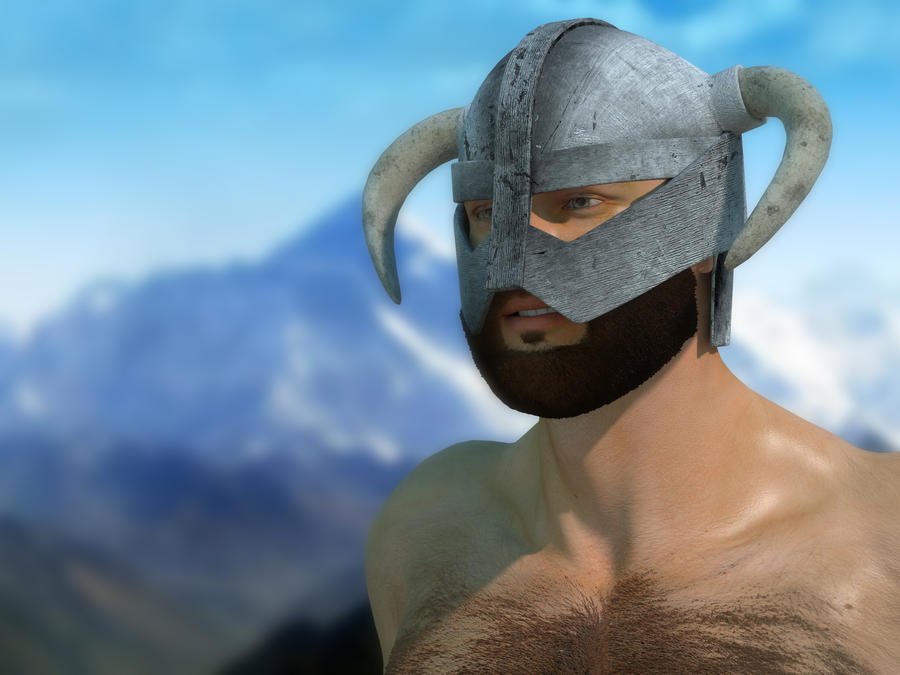
Dragon Born Helmet
I made this Dragonborn Helmet in Silo and decided to release it free.
If you are interested check here: Iron Helmet

Wednesday, 9 November 2011

IDL methods in Poser
Thank you for visiting my blog, I hope you will find this tutorial useful.
I will guide you through three methods of using my new Product ID-Light. If you do not have ID-Light you may be able to follow some points and still understand but some points need props and settings only included in the ID-Light product.
First of all this collection of lights can be used without the use of IDL (InDirect Light) which means you can use the product with Poser 6 and onwards. The results in Poser 6 and 7 however will vary considerable from Poser 8 onwards.
If you do however have Poser 8 onwards you have the extra benefit of using IDL.
Method one- IBL lighting(used in Poser 6 onwards)
ID-Light includes several IBL(Image Based Lights) which are created using the same images as the IDL set ups use. These IBL lights give different results but nevertheless are a great way to get excellent renders fast. Using these lights is very easy, once located in your runtime you click "Apply Library Preset" and there you have it, pre-made lighting that you can use as it is or add extra lights depending on your desired result.
Method two-IBL and IDL (for Poser 8 onwards)
Although not the traditional method of using Indirect lighting, Poser can use an IBL light to illuminate the scene rather than the more usual Environment Sphere method. Since Poser 8 there has been the option to use IDL, this option can be toggled in the Render settings and is a simple tick box. To use the IBL lights included in ID-Light in conjunction with IDL all you have to do is follow Method one and then before rendering ensure your IDL box is ticked.
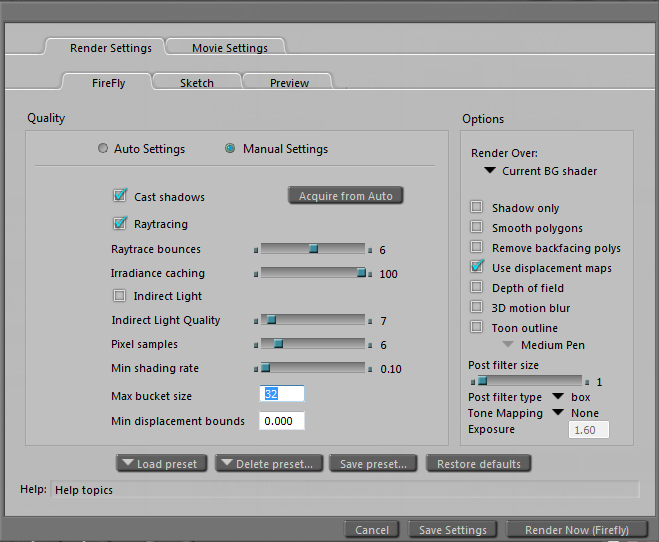
Regarding render settings, I advise using the following settings.

These setting are different to my usual advised settings and I have found them to be the best settings for a balanced outcome. This means getting the best quality at the best possible render time. If you continue to use the settings I normally use you will have very long render times and quite frankly not much better results.
Method 3-Environment Sphere
An environment sphere allows IDL to work the way it was designed to by trapping light rays within a certain area and allowing them to bounce around. The result you get from IDL is a realistic one and means there is no need for Ambient Occlusion.
Located in the "Props" folder is a sphere named "EnviroSphere" This sphere is set up for use in IDL lighting and once loaded using the "Apply Library Preset" option you will need to enter the "Material Room".
Once in the material room you will notice the sphere has an image attached to it. If you wish to change the default image navigate to you materials folder of your runtime and find the IDLight folder. This folder contains preset materials for the sphere and simply clicking the "Apply Library Preset" button will change the colour produced by the sphere.
Now on retuning to the "Pose Room" you will probaly want to add some directional light to your scene. ID-Light comes with preset light separates to make things a little easier. These lights are located in your Light folder under IDLight. You have the option to add several point lights which will simulate a light similar to a bulb casting a degrading light from a single point in all directions. Also there are two "Sun" lights. These lights cast and infinite light source with no degradation over distance. All of these lights include Specular highlighting as default but if you find you scene is lacking in Specular highlights you can add the "Specular Light" this light only casts Highlights without adding extra illumination or shadows. To add several lights from the library you must use the "Add preset to current scene Lights" button. This will add a light without clearing the previously loaded lights.
Noteworthy extras: Hiding the Sphere.
One of the main advantages of using an IBL light instead of the Environment sphere is that your background is still clear meaning in Photoshop you are free to add your own background. This unfortunately is the case with Poser 8 and Pro 2010. You can however hide an object from rendering in poser 9 and pro 2012. Simply untick the "visible in camera box" This will then remove the sphere at render time.
In conclusion if you want to use a blank background in poser 8 your best bet is to use the IBL light in conjunction with IDL.
I hope you found this tutorial useful. If you have any extra questions that I have not covered here please contact me: moonscapegraphics@yahoo.co.uk
I will guide you through three methods of using my new Product ID-Light. If you do not have ID-Light you may be able to follow some points and still understand but some points need props and settings only included in the ID-Light product.
First of all this collection of lights can be used without the use of IDL (InDirect Light) which means you can use the product with Poser 6 and onwards. The results in Poser 6 and 7 however will vary considerable from Poser 8 onwards.
If you do however have Poser 8 onwards you have the extra benefit of using IDL.
Method one- IBL lighting(used in Poser 6 onwards)
ID-Light includes several IBL(Image Based Lights) which are created using the same images as the IDL set ups use. These IBL lights give different results but nevertheless are a great way to get excellent renders fast. Using these lights is very easy, once located in your runtime you click "Apply Library Preset" and there you have it, pre-made lighting that you can use as it is or add extra lights depending on your desired result.
Method two-IBL and IDL (for Poser 8 onwards)
Although not the traditional method of using Indirect lighting, Poser can use an IBL light to illuminate the scene rather than the more usual Environment Sphere method. Since Poser 8 there has been the option to use IDL, this option can be toggled in the Render settings and is a simple tick box. To use the IBL lights included in ID-Light in conjunction with IDL all you have to do is follow Method one and then before rendering ensure your IDL box is ticked.
Regarding render settings, I advise using the following settings.

These setting are different to my usual advised settings and I have found them to be the best settings for a balanced outcome. This means getting the best quality at the best possible render time. If you continue to use the settings I normally use you will have very long render times and quite frankly not much better results.
Method 3-Environment Sphere
An environment sphere allows IDL to work the way it was designed to by trapping light rays within a certain area and allowing them to bounce around. The result you get from IDL is a realistic one and means there is no need for Ambient Occlusion.
Located in the "Props" folder is a sphere named "EnviroSphere" This sphere is set up for use in IDL lighting and once loaded using the "Apply Library Preset" option you will need to enter the "Material Room".
Once in the material room you will notice the sphere has an image attached to it. If you wish to change the default image navigate to you materials folder of your runtime and find the IDLight folder. This folder contains preset materials for the sphere and simply clicking the "Apply Library Preset" button will change the colour produced by the sphere.
Now on retuning to the "Pose Room" you will probaly want to add some directional light to your scene. ID-Light comes with preset light separates to make things a little easier. These lights are located in your Light folder under IDLight. You have the option to add several point lights which will simulate a light similar to a bulb casting a degrading light from a single point in all directions. Also there are two "Sun" lights. These lights cast and infinite light source with no degradation over distance. All of these lights include Specular highlighting as default but if you find you scene is lacking in Specular highlights you can add the "Specular Light" this light only casts Highlights without adding extra illumination or shadows. To add several lights from the library you must use the "Add preset to current scene Lights" button. This will add a light without clearing the previously loaded lights.
Noteworthy extras: Hiding the Sphere.
One of the main advantages of using an IBL light instead of the Environment sphere is that your background is still clear meaning in Photoshop you are free to add your own background. This unfortunately is the case with Poser 8 and Pro 2010. You can however hide an object from rendering in poser 9 and pro 2012. Simply untick the "visible in camera box" This will then remove the sphere at render time.
In conclusion if you want to use a blank background in poser 8 your best bet is to use the IBL light in conjunction with IDL.
I hope you found this tutorial useful. If you have any extra questions that I have not covered here please contact me: moonscapegraphics@yahoo.co.uk
Saturday, 5 November 2011
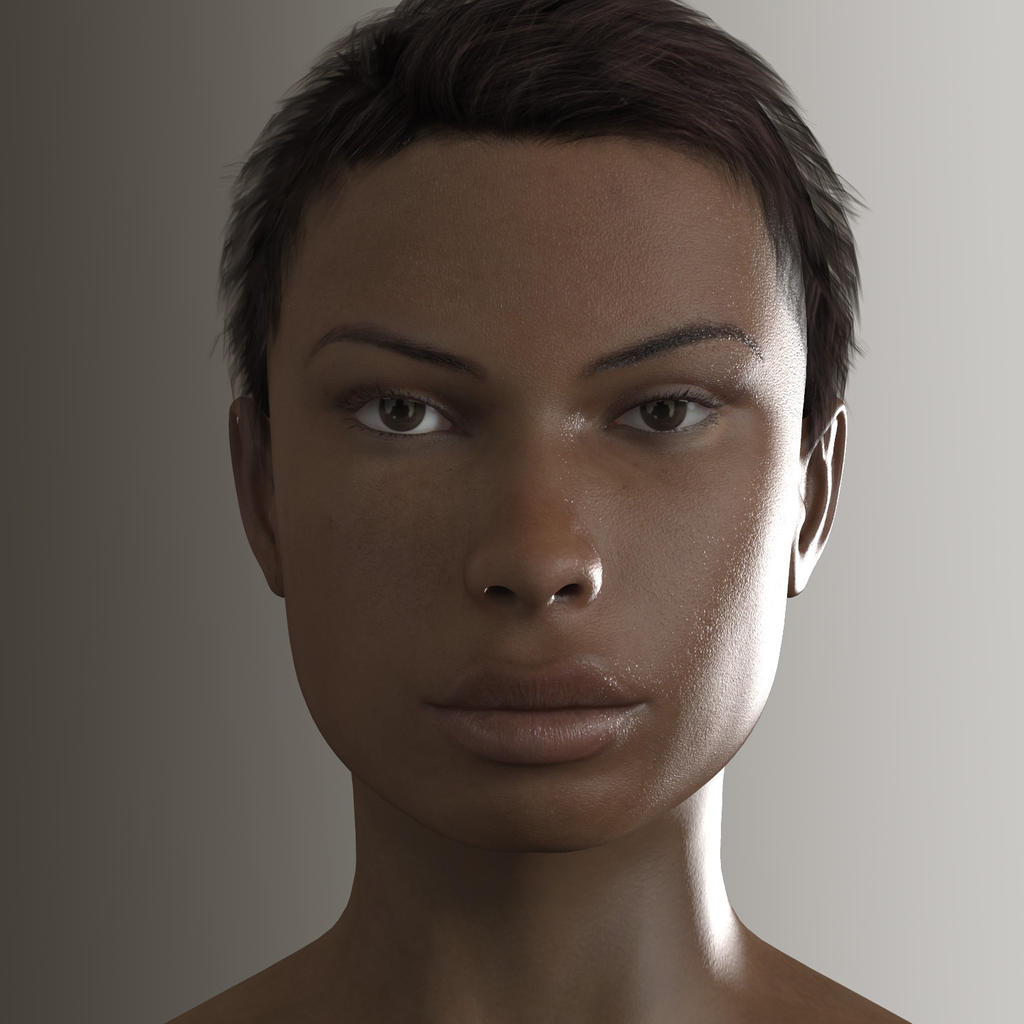
Nena V4 Character FREE
I have decided to post Nena, one of my first custom V4 characters, for free.
You can download Nena's custom head morph and here various body morphs over at ShareCG.
Direct Link: Nena Custom Morph
Images:

You can download Nena's custom head morph and here various body morphs over at ShareCG.
Direct Link: Nena Custom Morph
Images:
Monday, 31 October 2011
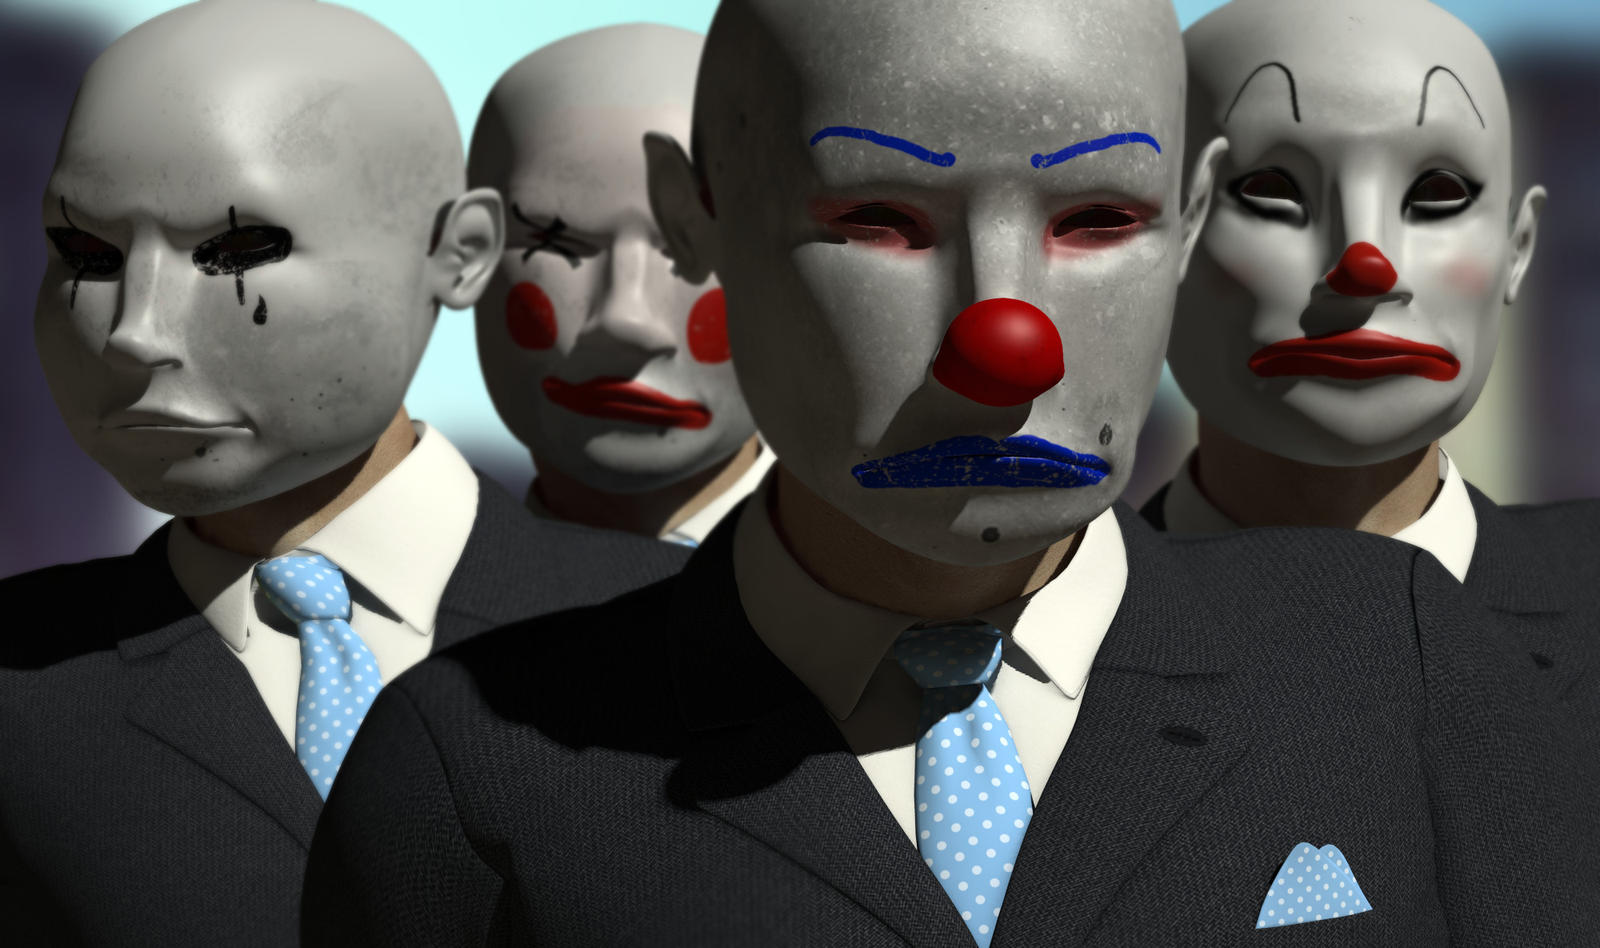
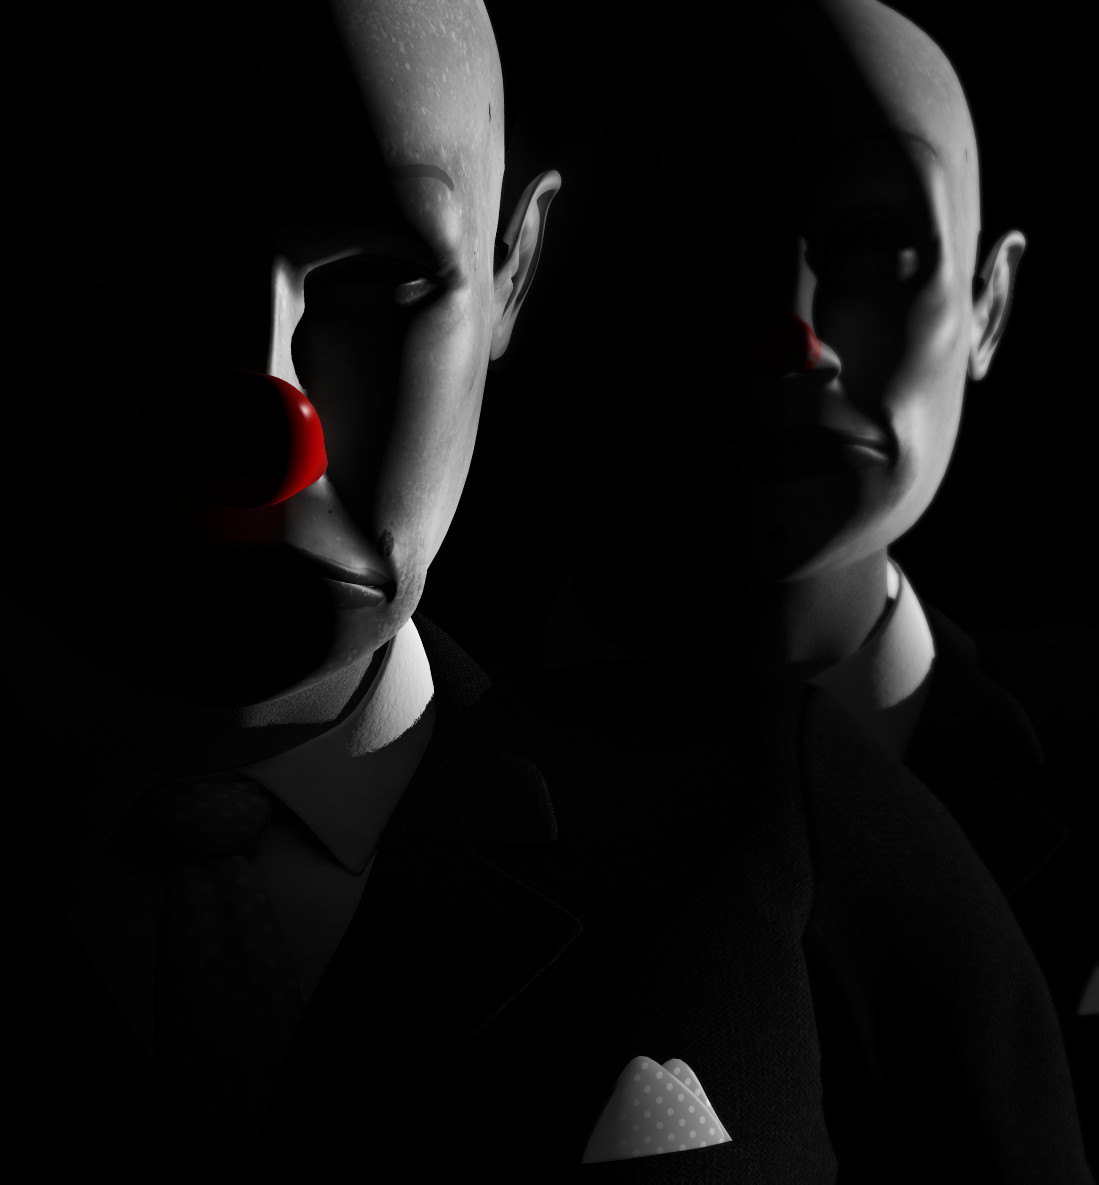
Disguised: The Clown
I have just released a new product called The Clown over at Renderosity.
This is a clown mask prop for Micheal 4 and Victoria 4 and can be used in both DAZstudio and Poser.
The Clown mask comes with four textures and sixteen morphs.
Check out these images:


This is a clown mask prop for Micheal 4 and Victoria 4 and can be used in both DAZstudio and Poser.
The Clown mask comes with four textures and sixteen morphs.
Check out these images:
Friday, 23 September 2011
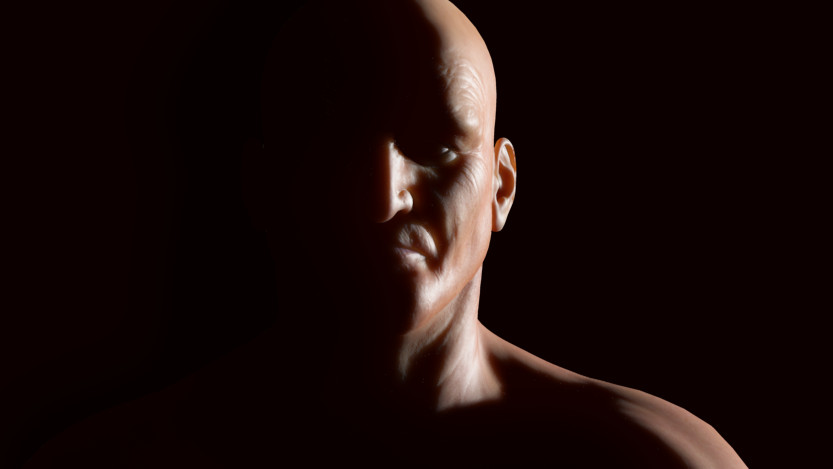
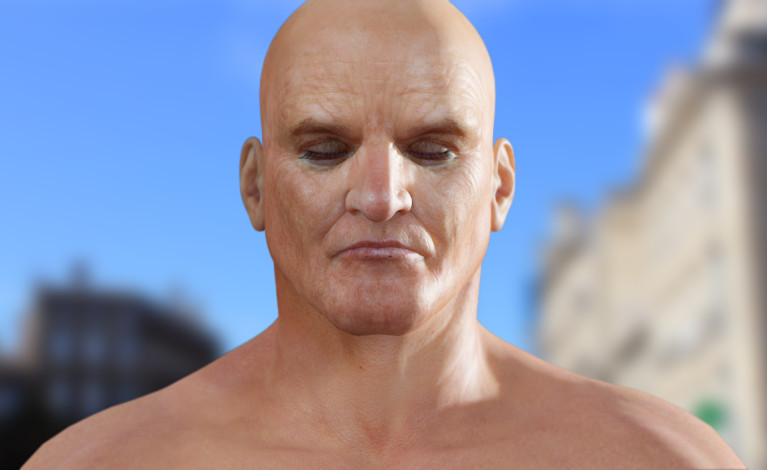
Poser has SSS at last!!
At last Poser has some real Subsurface Scattering. I have just been playing around a bit trying to learn the new features.
I will be uploading a couple of tutorials once I have got the hang of it but for now check out some of these examples:


Poser 9 and Poser Pro 2012 are out now..You have to check them out :D
I will be uploading a couple of tutorials once I have got the hang of it but for now check out some of these examples:
Poser 9 and Poser Pro 2012 are out now..You have to check them out :D
Friday, 16 September 2011
The Empire says "buy this Blu-ray"
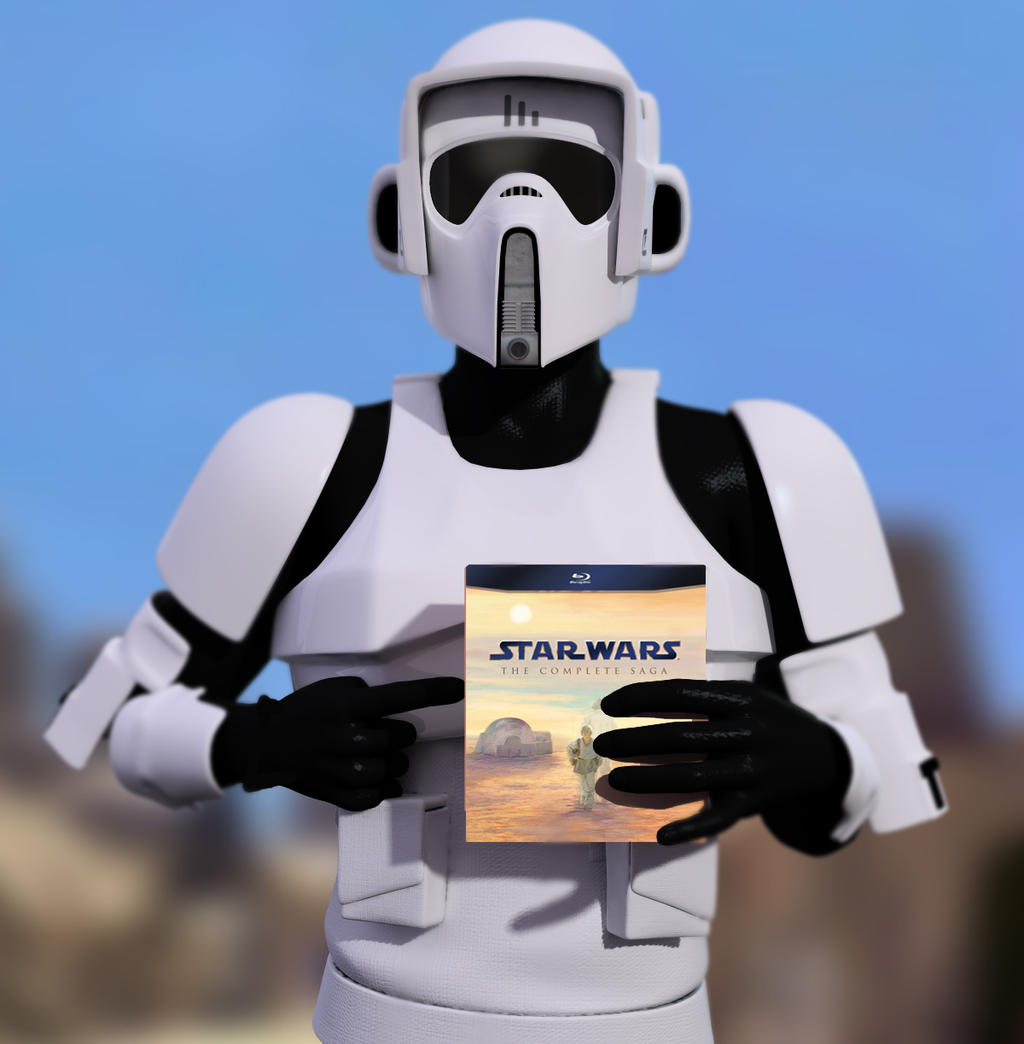
While watching the new Star wars Blu-ray release I thought of this idea. I created this armour in Silo and then rendered this image Poser..
Tuesday, 13 September 2011
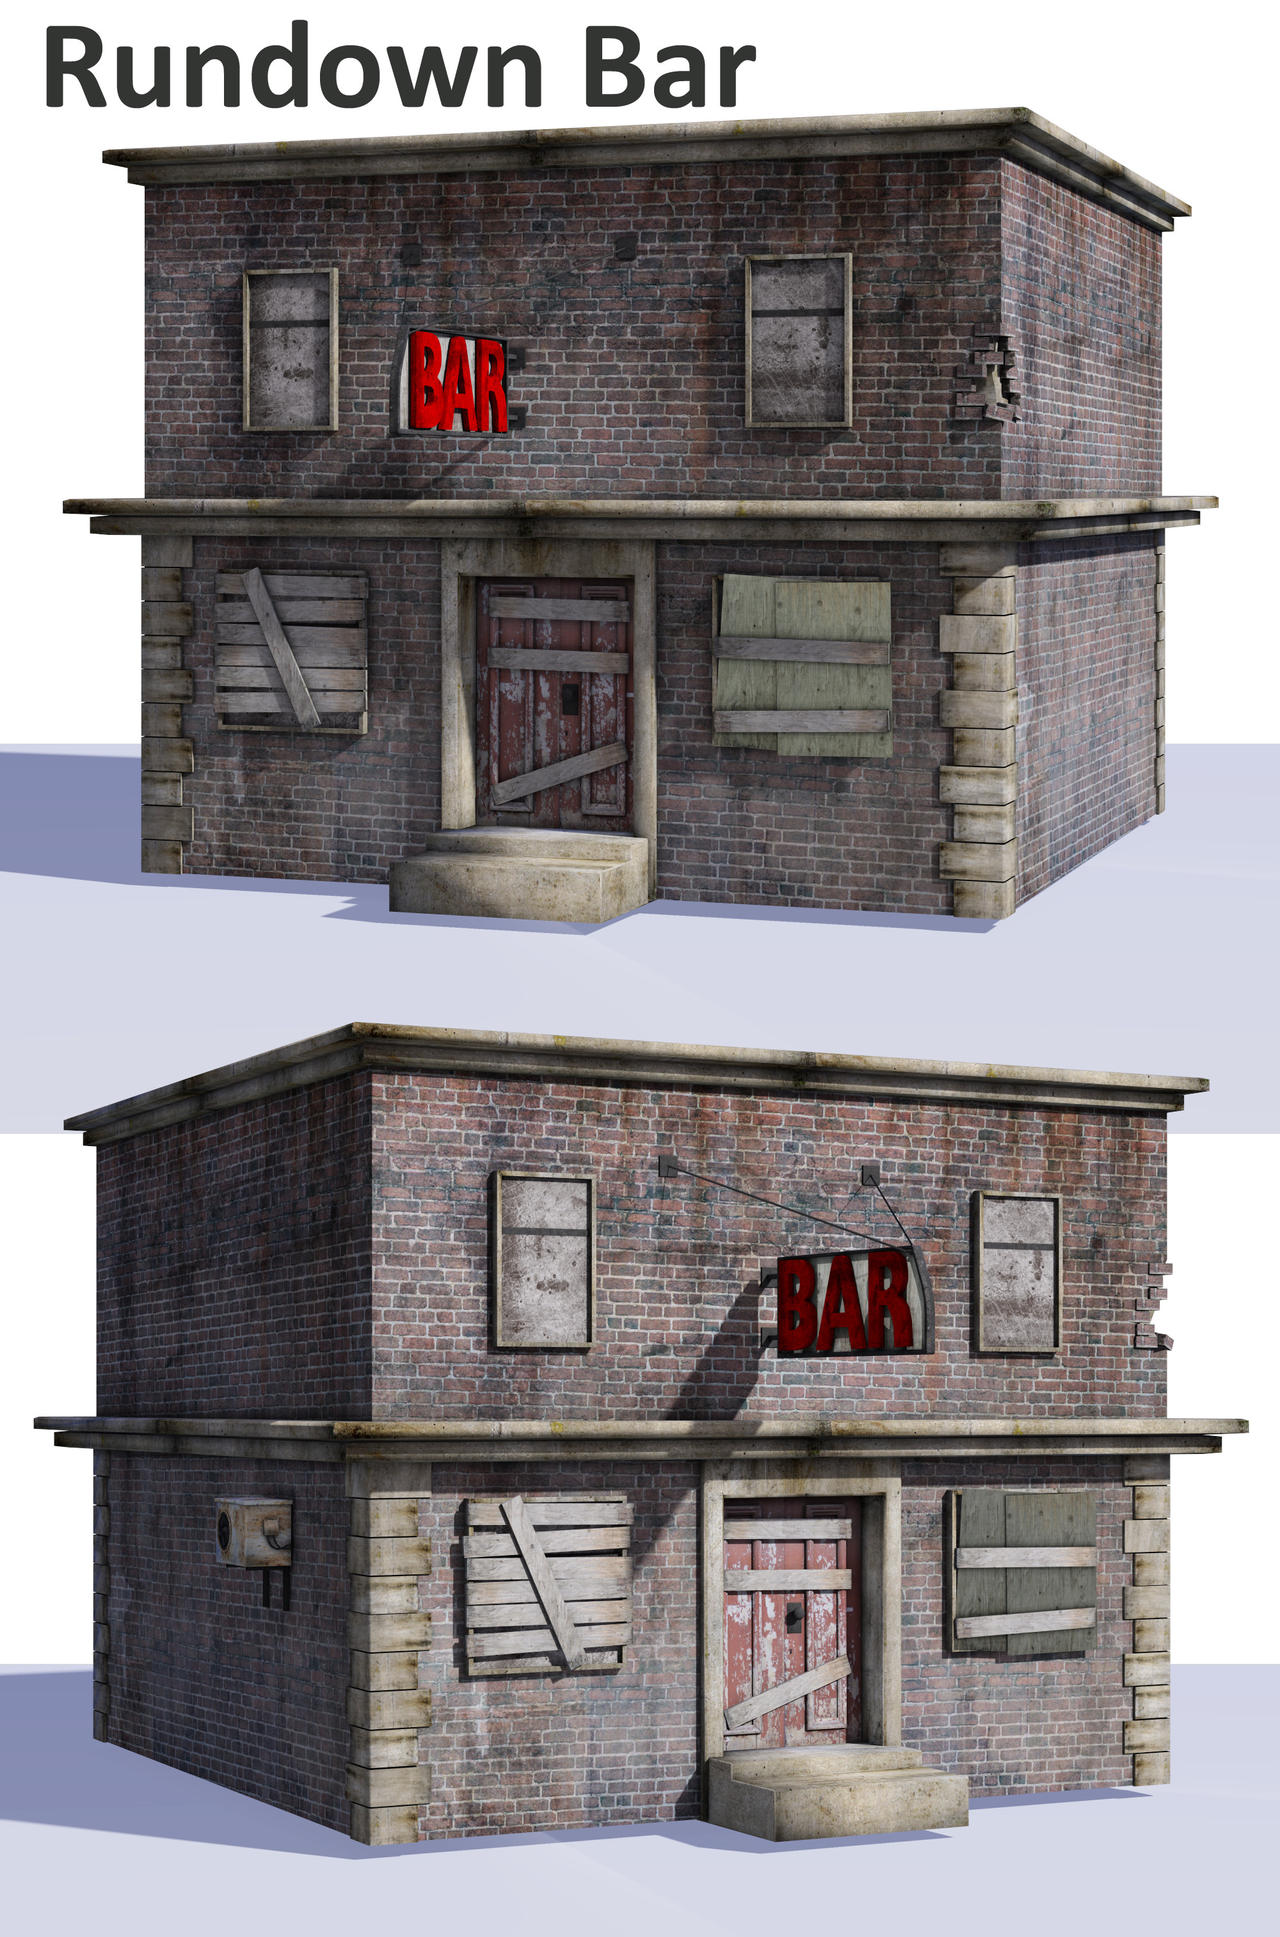
Rundown Bar
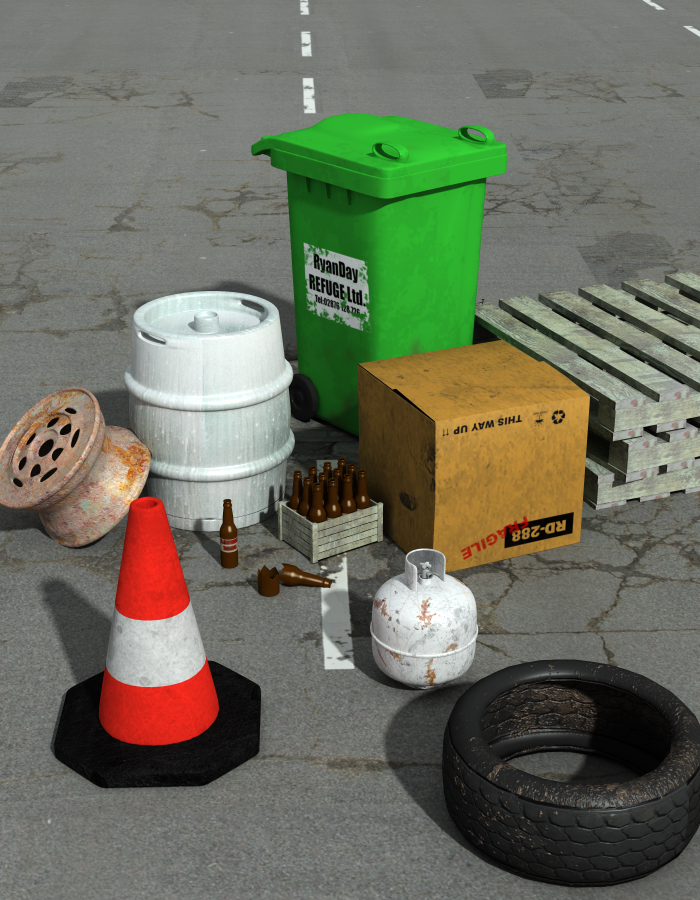
Since my last post I have completed the bar scene and created several props to add to the scene.
I have also started up Moonscape Graphics, a studio focusing on creating Poser content.
The Rundown Bar is the first product to be released by Moonscape Graphics and is available from RuntimeDNA.
As mentioned in my last post I plan on creating more buildings based on this theme as I have many ideas.
Here are some images:
Sunday, 3 July 2011
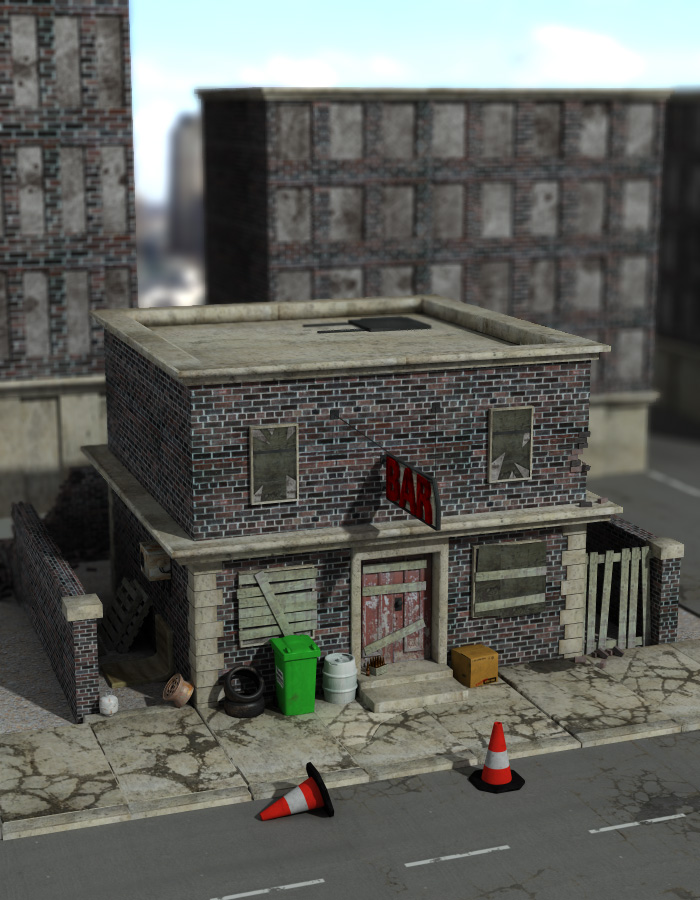
Ghost town
I have started working on a new project now that the Subway is completed. I will try not to drag my knuckles as much on this one and as of now things are going pretty well.
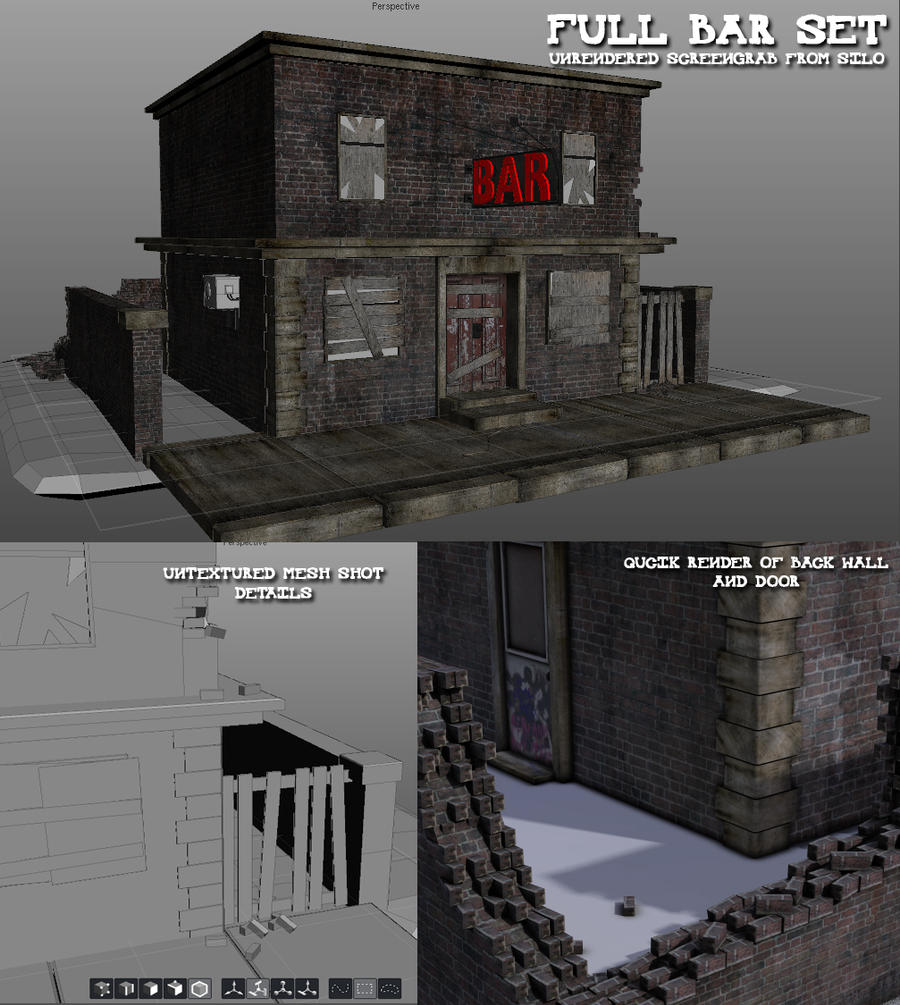
I created a building inspired by the Fallout games and I am planning on creating more until I have a full street and maybe (thinking ambitiously) a whole town.
I started with the Bar, check it out;

This only took me two days to complete so hopefully I am on a role. I will update soon with more buildings but in the meantime please if you have any ideas or input let me know in a comment.
UPDATE: I have added some more to this scene. Here is an image showing some new details.

I created a building inspired by the Fallout games and I am planning on creating more until I have a full street and maybe (thinking ambitiously) a whole town.
I started with the Bar, check it out;
This only took me two days to complete so hopefully I am on a role. I will update soon with more buildings but in the meantime please if you have any ideas or input let me know in a comment.
UPDATE: I have added some more to this scene. Here is an image showing some new details.
Saturday, 23 April 2011
Dynamic Tutorial
Dynamic Clothing Tutorial
Intro
The Cloth Room in Poser is a great tool for adding realism to your renders. The Cloth room can accurately simulate draped cloth over any surface.
This process is rarely used as it can seem a little daunting to start with. Most people using Poser will be comfortable using Conforming Clothing in Poser and because Dynamic cloth works differently certain parts of the process can be confusing.
In actual fact once you have learnt the basics, using dynamic cloth is easy and the results often turn out better than using conforming clothing.
As opposed to conforming clothing which incldes a skeleton/rig which matches its intended figure, Dynamic clothing has no skeleton/rig and therefore has no immediate way to follow your figures movement.
With Dynamic Cloth you use the Cloth room to "Clothify" a 3d mesh (this can be done with any 3d mesh and isn't restricted to clothes) then set up "Collisions" so that the cloth knows which surfaces are solid. Poser then calculates the drape of the cloth over a chosen set of animation frames.
The following steps will guide you through setting up and simulating a dynamic Skirt for V4 available for free here: Micro Skirt
After loading up poser and your desired Figure (In this case V4) start by resetting your figures rotations to Zero and removing any IK settings.
To remove IK settings navigate to Figure>Use Inverse Kinematics> then untick any of the body parts listed.
To Zero the rotations open the Joint Editor by navigating to Window>Joint Editor

Once the Joint Editor opens select your figures Hip followed by the "Zero Rotations" Button.
You should see a slight change in your figures pose. Usually their feet extrude through the floor.
Now you can close the Joint editor and load your Dynamic Prop into the scene.
I have included a link to a free Dynamic Skirt to practice with.
Once the skirt is loaded make sure it is selected and then parent it to your figure.
To parent the skirt to your figure navigate to Object>Change Parent and then select the appropriate body part for your selected clothing e.g. vest parents to chest, pants parent to hip.

In this case select the Hip for a skirt.
Now the skirt will move with your figure.
At this point you can Pose your figure. Remember that Dynamic Cloth needs "time" to drape this mean you should set up your scene near to or at the end of your animation cycle. The default animation cyle in Poser is 30 frames. You can alter this to have more frames or less depending on whether you feel the cloth is draping enough by the end or not.
I usually stay with the default 30frames.

So after your figure is posed you should see the skirt has followed v4s Hip but you now need to set up the cloth simulation settings and run the drape calculation.
Setting up the skirt so Poser views it as Cloth.
Enter the Cloth Room (by clicking the "Cloth" tab just below your navigation bar)
Once you have entered the Cloth Room ensure you have the skirt selected (this will make some of the next steps quicker)
Now select the "New Simulation" Button.
This will bring up the Simulation settings. Here you define the basic parameters of the simuation.

The simulation range: This setting shows how much of the animation period will be used to simulate cloth. This should usually be set for the same period as your animation, so if you have changed your animation to only 10 frames make sure
this number matches.
The Additional Cloth Collision Options: These settings determine how the cloth interacts with the solid objects in the scene. Normally just ticking the "Cloth Self Collision" button is enough here but sometimes it might be better to have cloth interact differently if you are getting alot of poke through.
Cloth Draping: Here you can add on some additional frames which will act as an initial draping stage. This can be usful if your cloth has some poke through at the start of the animation. Adding a couple of frames here gives poser a change to try and fix that poke through before the main simulation.
The setings in the above image are the ones I generally use.
After clicking ok, you now need to clothify your clothing. Click the "Clothify" button.
You then select your clothing but if you already had the intended clothing selected it will automatically be selected here.
After clicking OK you then set up your collisions. Click the "Collide Against" button.

You can now select everything you want your cloth to collide with by clicking the "Add/Remove" button which will show a list of everything in the scene. Checking the boxes next to each item adds it to the collision list. Once you have finished click OK (for this tutorial you only need to select Victoria4)

The Four Dials alter the cloth density and how close the cloth falls on your figure. The smaller the numbers the closer and thinner the material appears. I usually use the setting shown in the image above.
You can set Poser to ignore hand, feet and head. If your clothing is nowhere near any of these body parts you can tick them and save some calculation time.
Now you have set up your cloth for simulation. Once you have done this a few times you will find this process doesn't take too long.
The last thing to do now is to click "Calculate Simulation"
Intro
The Cloth Room in Poser is a great tool for adding realism to your renders. The Cloth room can accurately simulate draped cloth over any surface.
This process is rarely used as it can seem a little daunting to start with. Most people using Poser will be comfortable using Conforming Clothing in Poser and because Dynamic cloth works differently certain parts of the process can be confusing.
In actual fact once you have learnt the basics, using dynamic cloth is easy and the results often turn out better than using conforming clothing.
As opposed to conforming clothing which incldes a skeleton/rig which matches its intended figure, Dynamic clothing has no skeleton/rig and therefore has no immediate way to follow your figures movement.
With Dynamic Cloth you use the Cloth room to "Clothify" a 3d mesh (this can be done with any 3d mesh and isn't restricted to clothes) then set up "Collisions" so that the cloth knows which surfaces are solid. Poser then calculates the drape of the cloth over a chosen set of animation frames.
The following steps will guide you through setting up and simulating a dynamic Skirt for V4 available for free here: Micro Skirt
After loading up poser and your desired Figure (In this case V4) start by resetting your figures rotations to Zero and removing any IK settings.
To remove IK settings navigate to Figure>Use Inverse Kinematics> then untick any of the body parts listed.
To Zero the rotations open the Joint Editor by navigating to Window>Joint Editor

Once the Joint Editor opens select your figures Hip followed by the "Zero Rotations" Button.
You should see a slight change in your figures pose. Usually their feet extrude through the floor.
Now you can close the Joint editor and load your Dynamic Prop into the scene.
I have included a link to a free Dynamic Skirt to practice with.
Once the skirt is loaded make sure it is selected and then parent it to your figure.
To parent the skirt to your figure navigate to Object>Change Parent and then select the appropriate body part for your selected clothing e.g. vest parents to chest, pants parent to hip.

In this case select the Hip for a skirt.
Now the skirt will move with your figure.
At this point you can Pose your figure. Remember that Dynamic Cloth needs "time" to drape this mean you should set up your scene near to or at the end of your animation cycle. The default animation cyle in Poser is 30 frames. You can alter this to have more frames or less depending on whether you feel the cloth is draping enough by the end or not.
I usually stay with the default 30frames.
So after your figure is posed you should see the skirt has followed v4s Hip but you now need to set up the cloth simulation settings and run the drape calculation.
Setting up the skirt so Poser views it as Cloth.
Enter the Cloth Room (by clicking the "Cloth" tab just below your navigation bar)
Once you have entered the Cloth Room ensure you have the skirt selected (this will make some of the next steps quicker)
Now select the "New Simulation" Button.
This will bring up the Simulation settings. Here you define the basic parameters of the simuation.

The simulation range: This setting shows how much of the animation period will be used to simulate cloth. This should usually be set for the same period as your animation, so if you have changed your animation to only 10 frames make sure
this number matches.
The Additional Cloth Collision Options: These settings determine how the cloth interacts with the solid objects in the scene. Normally just ticking the "Cloth Self Collision" button is enough here but sometimes it might be better to have cloth interact differently if you are getting alot of poke through.
Cloth Draping: Here you can add on some additional frames which will act as an initial draping stage. This can be usful if your cloth has some poke through at the start of the animation. Adding a couple of frames here gives poser a change to try and fix that poke through before the main simulation.
The setings in the above image are the ones I generally use.
After clicking ok, you now need to clothify your clothing. Click the "Clothify" button.
You then select your clothing but if you already had the intended clothing selected it will automatically be selected here.
After clicking OK you then set up your collisions. Click the "Collide Against" button.

You can now select everything you want your cloth to collide with by clicking the "Add/Remove" button which will show a list of everything in the scene. Checking the boxes next to each item adds it to the collision list. Once you have finished click OK (for this tutorial you only need to select Victoria4)

The Four Dials alter the cloth density and how close the cloth falls on your figure. The smaller the numbers the closer and thinner the material appears. I usually use the setting shown in the image above.
You can set Poser to ignore hand, feet and head. If your clothing is nowhere near any of these body parts you can tick them and save some calculation time.
Now you have set up your cloth for simulation. Once you have done this a few times you will find this process doesn't take too long.
The last thing to do now is to click "Calculate Simulation"
Friday, 15 April 2011
Garden Column
Here is an image I just completed using Indirect Lighting in Poser8.
I will be working on a Tutorial on IDL in Poser 8 so stay tuned.

P.s. If you are interested there is a topless version on My Deviant Art gallery:
Retro Devil
I will be working on a Tutorial on IDL in Poser 8 so stay tuned.

P.s. If you are interested there is a topless version on My Deviant Art gallery:
Retro Devil
Saturday, 2 April 2011
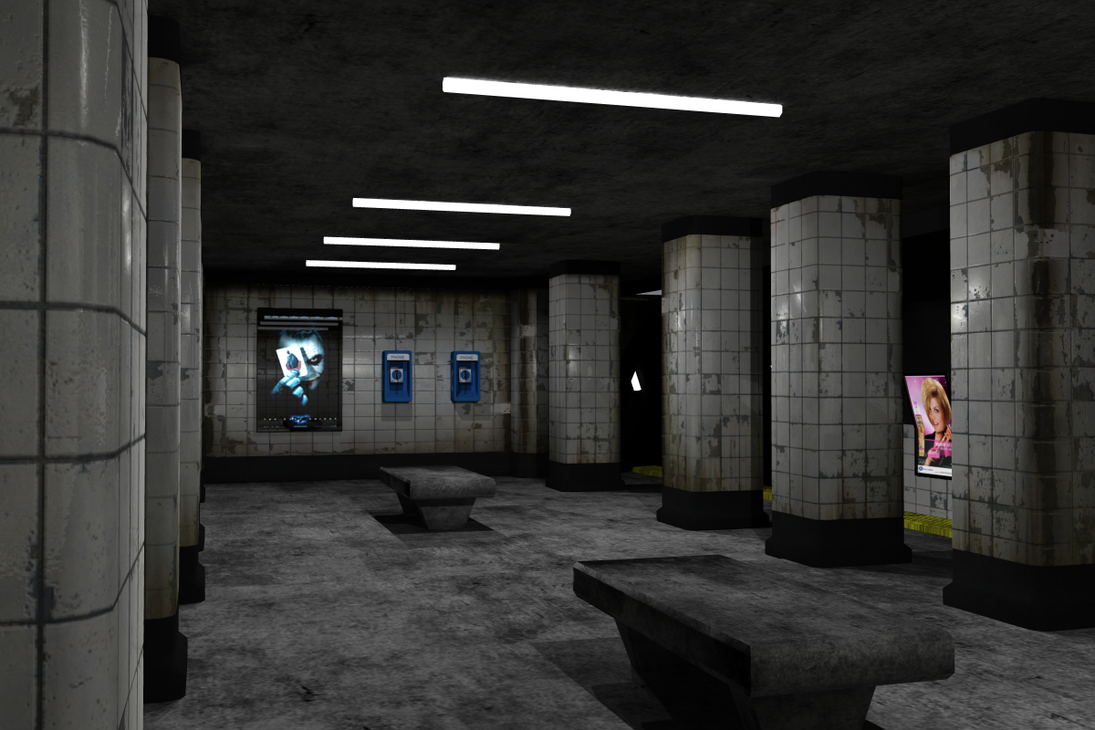
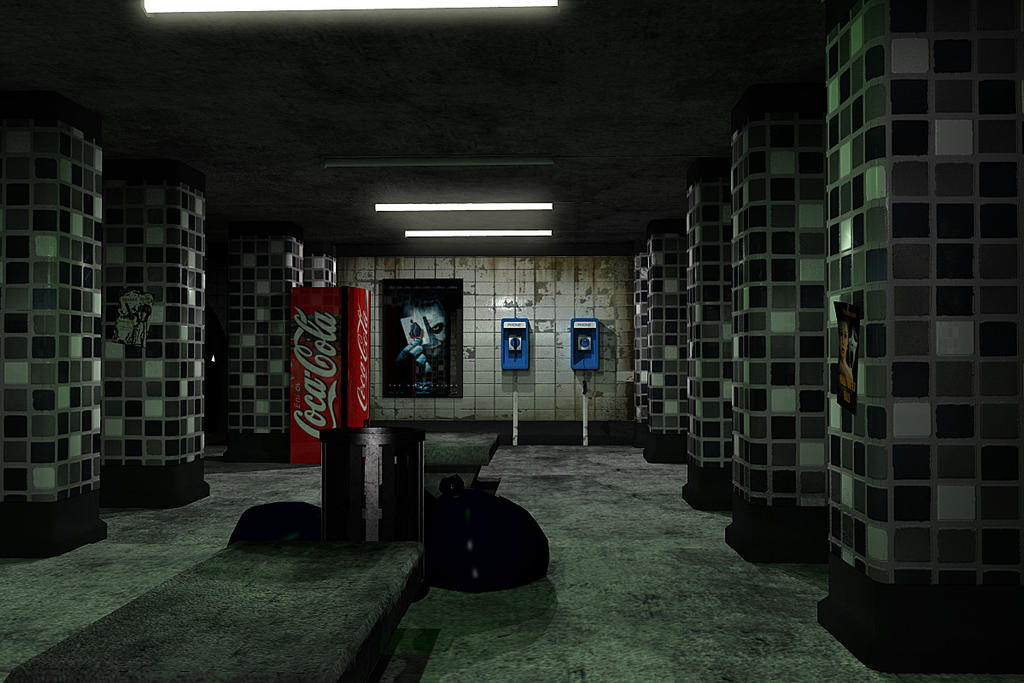
Subway Station
I have been working on a subway station scene which will probably be the first scene I complete in full and thought I would post some of the images here to show how I am getting on.
First render

The scene is pretty much complete now although I am always thinking of little tweaks here and there and I also want to add in a train at some point.
Render 2

Please let me know what you think.
First render
The scene is pretty much complete now although I am always thinking of little tweaks here and there and I also want to add in a train at some point.
Render 2
Please let me know what you think.
Sunday, 13 February 2011
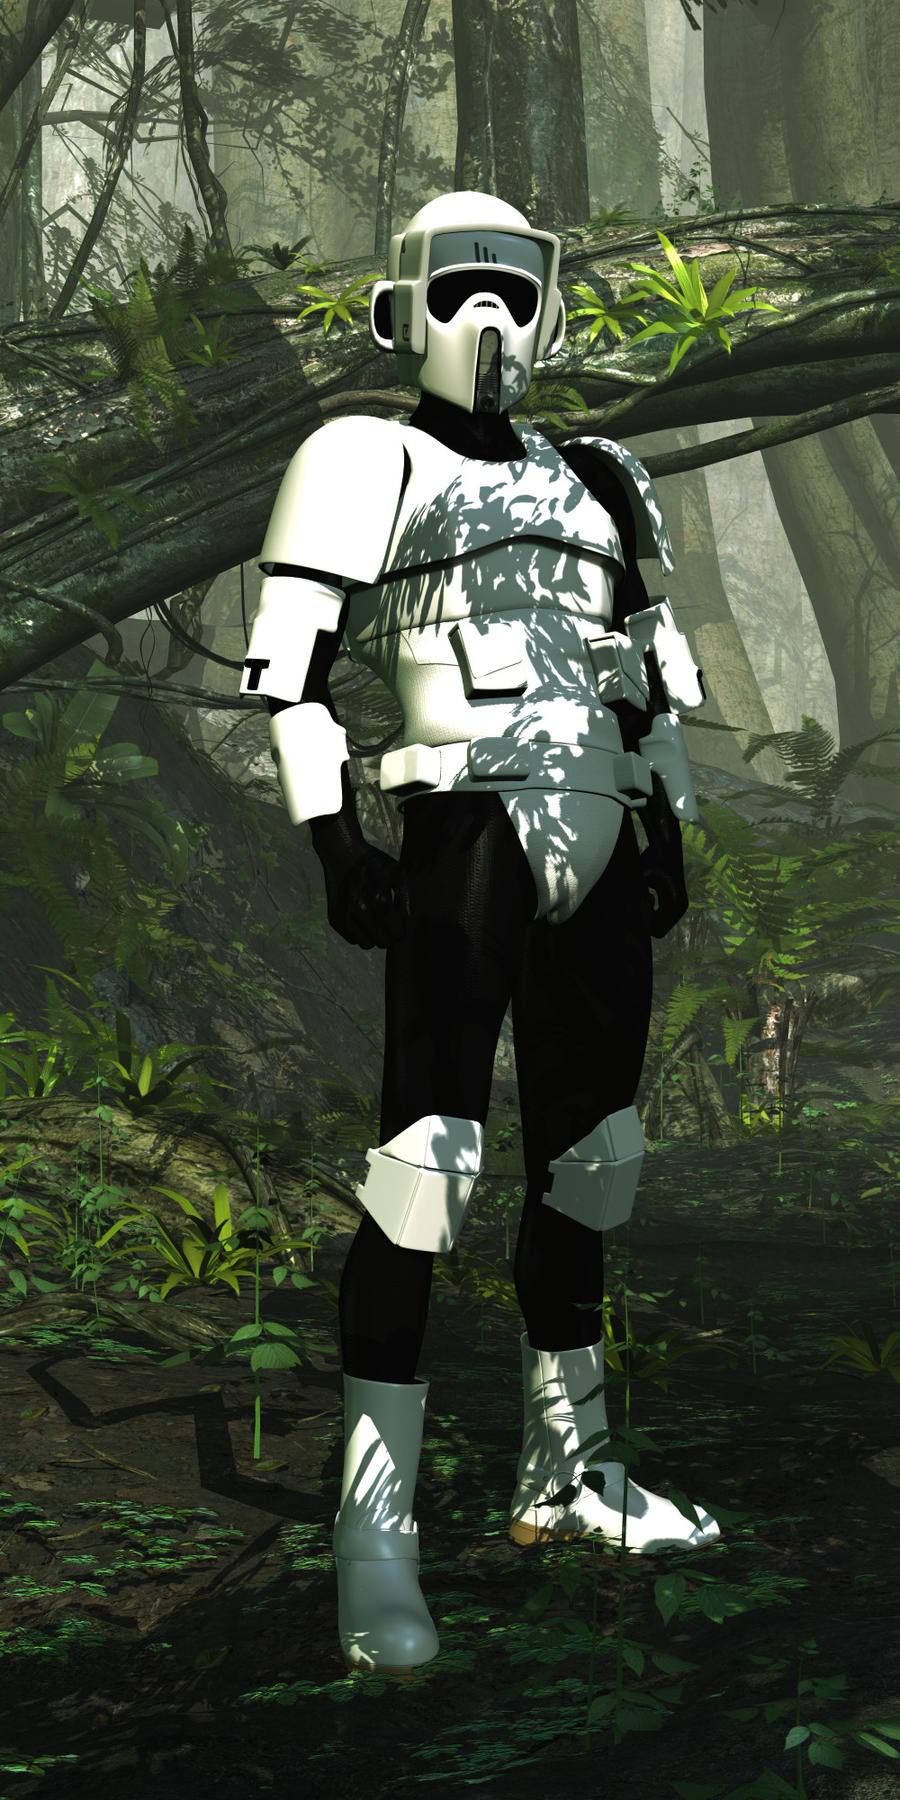
Scout Trooper Armour Complete
I have finished the Speeder Biker/Scout Trooper Armour for Posers Micheal 4.
The armour is available to download for free here: ScoutTrooper

The set comes complete with:
Scout Trooper Helmet [PROP]
Chest armour(includes computer on back)[PROP]
Shoulder pads[PROP]
Upper Arm Plates[PROP]
Lower Arm Plates[PROP]
Knee Pads[PROP]
Cummerbund[Conforming]
Boots[Conforming]
The following props are parented to the cummerbund
Belt Boxes[PROP]
Thermal Detonator[PROP]
I had help with conforming the Boots from TheSchell
The armour is available to download for free here: ScoutTrooper
The set comes complete with:
Scout Trooper Helmet [PROP]
Chest armour(includes computer on back)[PROP]
Shoulder pads[PROP]
Upper Arm Plates[PROP]
Lower Arm Plates[PROP]
Knee Pads[PROP]
Cummerbund[Conforming]
Boots[Conforming]
The following props are parented to the cummerbund
Belt Boxes[PROP]
Thermal Detonator[PROP]
I had help with conforming the Boots from TheSchell
Monday, 24 January 2011
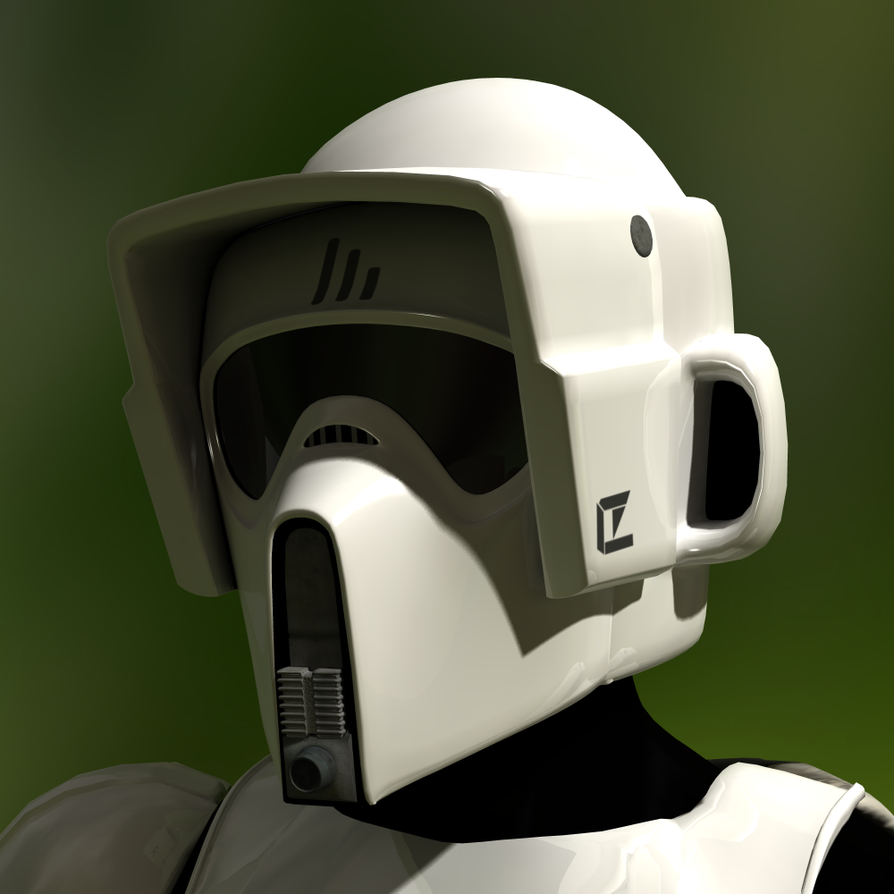
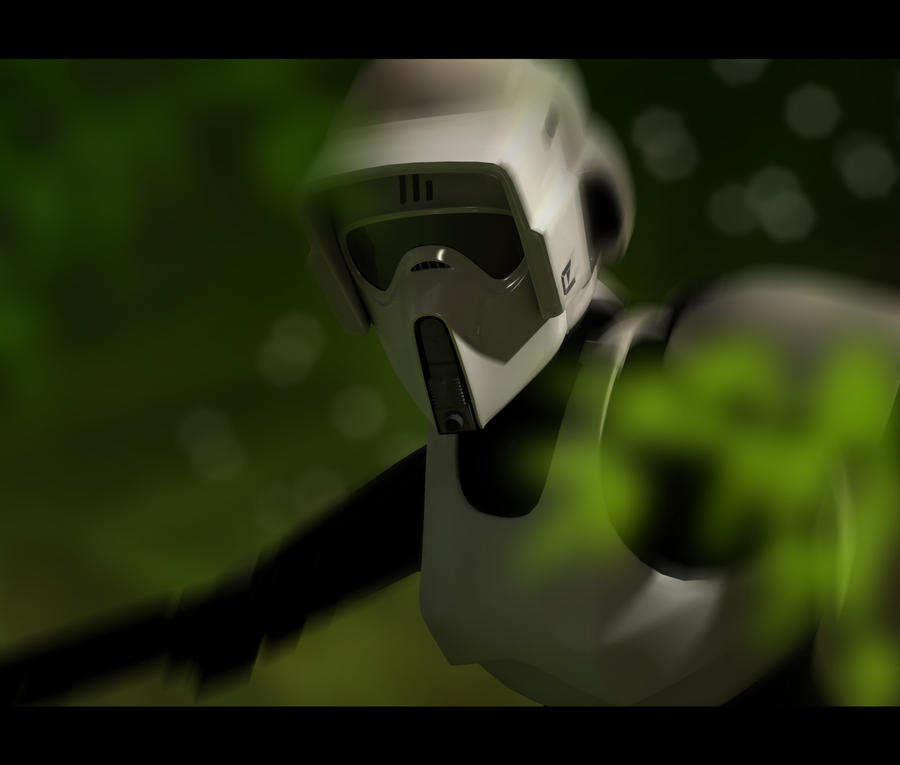
Scout Trooper Helmet
I decided to model a Scout Trooper Helmet yesterday and it turned out pretty nice.

I modelled the helmet in Silo and then used PhotoShop to add the textures. The render was then done in Poser8 using IDL(Indirect Lighting). I used a tweaked version of the light set I created in my previous Lighting Tutorial. I will be starting a tutorial on IDL soon.
A small Snippet from Wookiepedia about the Scout Trooper Helmet:
Scout trooper helmets incorporated enhanced macrobinocular viewplates capable of locating energy emissions, target magnification, night vision, and motion tracking. The helmets were polarized in typical stormtrooper fashion as well as concentrating the attention of the scout trooper directly ahead.
Here are some WIP images:

I have set the helmet up ready to use with Michael4 in Poser, although it can be easily fitted to other figures and you can download it for free here: Scout Trooper Helmet
Monday, 17 January 2011
Ambient Occlusion In Poser
Ambient Occlusion.
I touched upon the use of Ambient Occlusion in my last tutorial on Lighting. With this next tutorial I will go into some more detail and explain the different ways to use ambient occlusion within Poser.
Before you start please be aware that any numeric values I give in this tutorial be measured in "Feet". To check your unit type in Poser go to Edit>General Preferences then on the "Interface" tab select "Feet" as your Display Units.
What is Ambient Occlusion?
Basically Ambient Occlusion is a method of shading 3D objects in a way that more realistically resembles real life ambient light.
The results of Ambient Occlusion were shown in my Lighting tutorial so I will start off explaining how to set up the different ways to use Ambient Occlusion in Poser.
I suggest following the tutorial on light so you have a ready made IBL light ready for this tutorial as well as my render settings.
NOTE: It is worth mentioning that in Poser 8 and Poser pro 2010 the use of Ambient occlusion with IDL turned on in render setting is not a good idea. There will be some horrible effects and render times will be way too long.
I will be writing a tutorial on IDL in the future
Method 1-Lighting.
In poser you can choose to have Ambient Occlusion cast from your lighting set up. This method is the easiest and quickest way to apply AO(Ambient Occlusion). If you would like more control over your use of Ambient Occlusion you can follow Method 2 for setting up AO on individual materials.
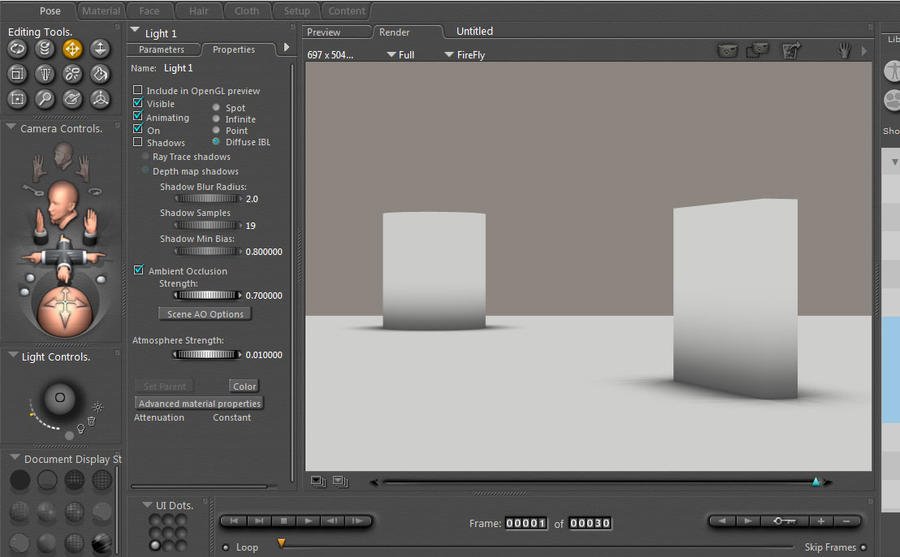
You can apply AO to any light in your scene but I feel the best results come from applying it to your IBL light.(If you are not using IBL then obviously apply it to another light or use the second method)
The below image shows AO used with IBL and Infinite light. The results are dramatically different..

To set up AO on your lighting you only have to click the tick button named "Ambient Occlusion" on the "Properties" panel of the selected light. (In this case IBLFill)
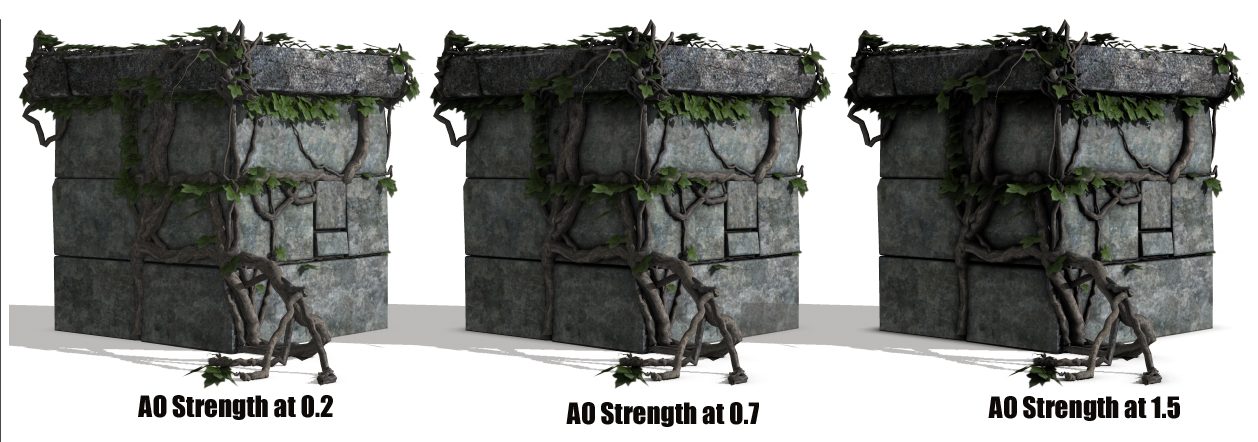
You can alter the Strength of you AO effect using the "Strength" slider.
The below images show AO at default 0.700 as well as 0.200 and 1.500

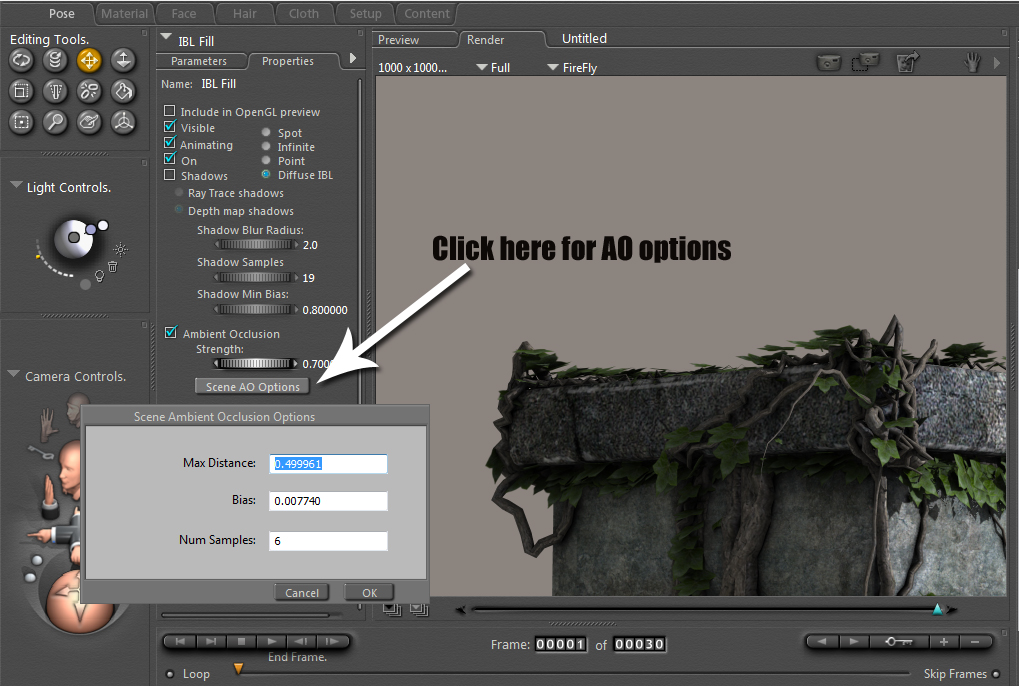
You can change AO settings if you want by clicking the "Scene AO Options" Button just under the Strength slider.
Usually the default setting are fine and using the Strength slider will meet most of your needs for AO preference; However Changing the settings can be useful to speed up render times or clean up rough looking AO patches.

AO settings.
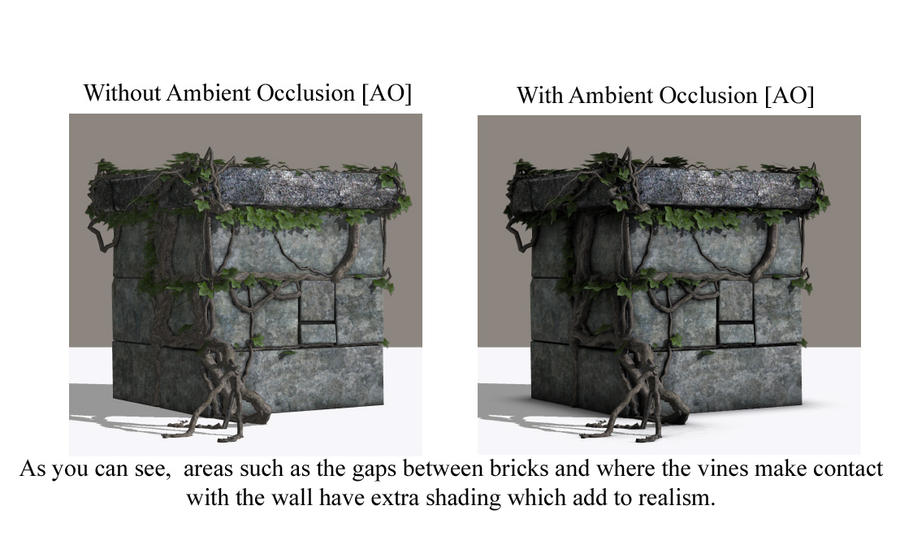
Ambient Occlusion works on a use of "Rays" simmilar to sun rays. As the light reflects off an object Poser Calculates the distance a ray travels before it comes into contact with another surface. The distance between these surfaces determines the darkness of the AO effect e.g. If two surfaces are touching like the vines on the wall here then the darkness will be at its maximum.
Max Distance.
You can alter the distance a ray travels using the Max Distance option. This in effect alters the darkness of the AO and has basically the same effect as the Strength Slider by increasing or decreasing the spread of the AO. I have witnessed no noticable change in render times when altering the Max Distance.
Ray Bias.
Ray Bias Will Alter the minimum distance a ray has to travel before showing the effect of AO. You will want this set to the lowest possible setting before you start getting blotchy shading.
You should only really need to alter this if you are getting blotchy shading. This problem occurs when the AO effect is being applied too soon after the light has reflected.
Pixel Samples
This setting affects the quality of the AO effect. The higher the number the better the quality. This setting DOES effect render times.
So if you feel your render times are extensive try lowering your pixel samples. This will affect the quality but it may be such a small amount you may not notice. If you feel the edges of your AO shading is a little crisp or rough you can up the pixel sample to smooth it out.
Method 2-Material Ambient Occlusion
Another method of applying AO to your renders is to apply it to your materials. This method allows greater control over your AO use and can be used to apply different amounts of AO to different materials as well as have materials with no AO at all.
With materials that contain transparency, for instance hair, Poser will take longer to calculate AO casting. Sometimes this may be TOO long and alot of the time you may feel the render time isn't worth the final result.
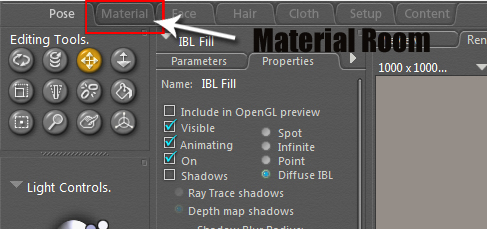
To apply AO in your material you need to add an Ambient Occlusion Node to you selected material. To do this enter the material room using the tabs along the top of your screen.

Once in the material room select the material you want to apply AO to using the drop down menus above the material window.
Now there is an easy way to apply AO and all you need to do is use the "Add AO Node" Wacro button at the right hand side of your material window. (This may be hidden and you may need to click the unhide tab to show it)
Once the Wacro button is clicked Poser will automatically connect an AO node to your material. You can now alter the effect of that AO node in the same way explain in the "AO Scene Options" above You have the same parameters that effect the AO in the same way.
#Of course you can create your own AO set up by right clicking in the material window and finding the Ambient Occlusion node. You will then have to attach the wires yourself. Once you get confident with using material room nodes you can start experimenting with you AO node arrangement. You may find more subtle or extreme uses for AO.#
Obviously this method of setting up AO for each material is more time consuming to set up but during rendering it may save you alot of time, especially if you only apply AO to objects that really need it. It will also allow for different levels of AO so if you want your characters skin to have a softer AO effect than their clothing or surrounding props that is possible.
Thank you for reading and I hope you have found this tutorial useful.
The following image was rendered using the light created in my last tutorial and I set up the AO in the material room with different AO settings for individual materials.

I touched upon the use of Ambient Occlusion in my last tutorial on Lighting. With this next tutorial I will go into some more detail and explain the different ways to use ambient occlusion within Poser.
Before you start please be aware that any numeric values I give in this tutorial be measured in "Feet". To check your unit type in Poser go to Edit>General Preferences then on the "Interface" tab select "Feet" as your Display Units.
What is Ambient Occlusion?
Basically Ambient Occlusion is a method of shading 3D objects in a way that more realistically resembles real life ambient light.
The results of Ambient Occlusion were shown in my Lighting tutorial so I will start off explaining how to set up the different ways to use Ambient Occlusion in Poser.
I suggest following the tutorial on light so you have a ready made IBL light ready for this tutorial as well as my render settings.
NOTE: It is worth mentioning that in Poser 8 and Poser pro 2010 the use of Ambient occlusion with IDL turned on in render setting is not a good idea. There will be some horrible effects and render times will be way too long.
I will be writing a tutorial on IDL in the future
Method 1-Lighting.
In poser you can choose to have Ambient Occlusion cast from your lighting set up. This method is the easiest and quickest way to apply AO(Ambient Occlusion). If you would like more control over your use of Ambient Occlusion you can follow Method 2 for setting up AO on individual materials.
You can apply AO to any light in your scene but I feel the best results come from applying it to your IBL light.(If you are not using IBL then obviously apply it to another light or use the second method)
The below image shows AO used with IBL and Infinite light. The results are dramatically different..

To set up AO on your lighting you only have to click the tick button named "Ambient Occlusion" on the "Properties" panel of the selected light. (In this case IBLFill)
You can alter the Strength of you AO effect using the "Strength" slider.
The below images show AO at default 0.700 as well as 0.200 and 1.500
You can change AO settings if you want by clicking the "Scene AO Options" Button just under the Strength slider.
Usually the default setting are fine and using the Strength slider will meet most of your needs for AO preference; However Changing the settings can be useful to speed up render times or clean up rough looking AO patches.
AO settings.
Ambient Occlusion works on a use of "Rays" simmilar to sun rays. As the light reflects off an object Poser Calculates the distance a ray travels before it comes into contact with another surface. The distance between these surfaces determines the darkness of the AO effect e.g. If two surfaces are touching like the vines on the wall here then the darkness will be at its maximum.
Max Distance.
You can alter the distance a ray travels using the Max Distance option. This in effect alters the darkness of the AO and has basically the same effect as the Strength Slider by increasing or decreasing the spread of the AO. I have witnessed no noticable change in render times when altering the Max Distance.
Ray Bias.
Ray Bias Will Alter the minimum distance a ray has to travel before showing the effect of AO. You will want this set to the lowest possible setting before you start getting blotchy shading.
You should only really need to alter this if you are getting blotchy shading. This problem occurs when the AO effect is being applied too soon after the light has reflected.
Pixel Samples
This setting affects the quality of the AO effect. The higher the number the better the quality. This setting DOES effect render times.
So if you feel your render times are extensive try lowering your pixel samples. This will affect the quality but it may be such a small amount you may not notice. If you feel the edges of your AO shading is a little crisp or rough you can up the pixel sample to smooth it out.
Method 2-Material Ambient Occlusion
Another method of applying AO to your renders is to apply it to your materials. This method allows greater control over your AO use and can be used to apply different amounts of AO to different materials as well as have materials with no AO at all.
With materials that contain transparency, for instance hair, Poser will take longer to calculate AO casting. Sometimes this may be TOO long and alot of the time you may feel the render time isn't worth the final result.
To apply AO in your material you need to add an Ambient Occlusion Node to you selected material. To do this enter the material room using the tabs along the top of your screen.
Once in the material room select the material you want to apply AO to using the drop down menus above the material window.
Now there is an easy way to apply AO and all you need to do is use the "Add AO Node" Wacro button at the right hand side of your material window. (This may be hidden and you may need to click the unhide tab to show it)
Once the Wacro button is clicked Poser will automatically connect an AO node to your material. You can now alter the effect of that AO node in the same way explain in the "AO Scene Options" above You have the same parameters that effect the AO in the same way.
#Of course you can create your own AO set up by right clicking in the material window and finding the Ambient Occlusion node. You will then have to attach the wires yourself. Once you get confident with using material room nodes you can start experimenting with you AO node arrangement. You may find more subtle or extreme uses for AO.#
Obviously this method of setting up AO for each material is more time consuming to set up but during rendering it may save you alot of time, especially if you only apply AO to objects that really need it. It will also allow for different levels of AO so if you want your characters skin to have a softer AO effect than their clothing or surrounding props that is possible.
Thank you for reading and I hope you have found this tutorial useful.
The following image was rendered using the light created in my last tutorial and I set up the AO in the material room with different AO settings for individual materials.
Friday, 7 January 2011
Poser Light Tutorial
I have been using Poser now for around six years and in that time have learn't alot about getting the best out of your renders. I have created light sets for Poser that have been best selling products at Renderosity and I have decided to write this tutorial for beginners in Poser art. Here you can learn the basics about creating light sets and I hope that you can expand on this yourself with experimentation. Some parts of the tutorial may require you to have a basic understanding of Posers user interface.
There are many ways in which to set up your lights which will all deliver different results but these are the steps I take when setting up a new light set.
Step 1:
IBL(Diffuse Light)
Start a new scene in Poser and delete all of the existing lights. You can do this one by one by selecting the light and then clicking the "Dustbin/Delete" button on the light panel.
Next use the "Create Light" icon to create a new light. This Light will be your IBL Diffuse light so in the Parameters/Properties panel click "Diffuse IBL". (I have also selected Ambient Occlusion But I will explain that later)

I always try and think of the IBL light as a shadow filler. For example any area in your image that is in shadow will be "filled" by Diffuse Light. (I will show this after adding the Infinite light.) For this reason I usually knock the IBL Intensity down to around 50% or less.
To easily Identify each light name this Light "IBL Fill" by clicking the name "Light 1" in your "Properties" pane.
Step 2: Infinite/ Sun Light
The next step is to create a new light and tick the button to assign it as an "Infinite" light.
Select Shadows and tick the Raytrace Shadows box. Raytrace shadows work more accurately than Depth map and in my opinion give better results overall. You can change the sharpness of the shadows here by altering the "Shadow Blur Radius" dial. I usually choose something between 0.0 and 2.0 but it is worth experimenting to fit with your scene.
For Raytrace shadows to work you must have raytrace ticked in your render settings. I will post an image of my final render settings at the end of the tutorial.
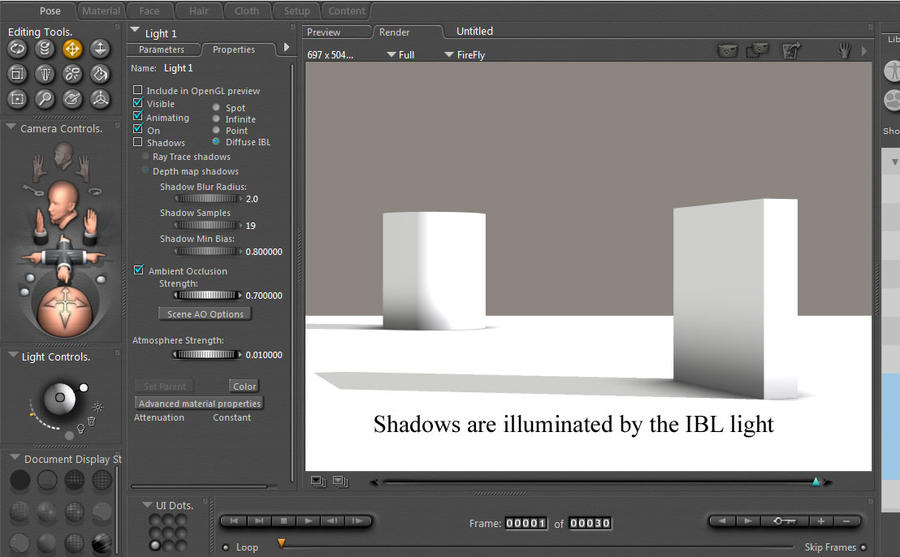
Here is the image rendered with the Infinite/Sun light added. The Infinite light works very simmilar to real life sun light. It is directional but it fills an infinite area so even if your object is way back in the distance light will be cast onto it from the Infinite light. You can see in the picture the IBL light is illuminating the shaded areas so they are not black.

Step 3: Refinement
At this point you have a pretty basic IBL based light set with all of the elements required for illuminating a scene.
You can decide now whether your IBL light is filling the shadows the amount you intend. You can alter the intensity to a point which suits you best. This also applys to the brightness of your Infinite light. If the illuminated areas are too bright and blown out decrease your Intensity slightly until you are happy with the results.
Now I usually add another Infinite Light to the scene that will be used to cast specular light. Specular light will give shine to objects and having a seperate light for this task gives you more control.
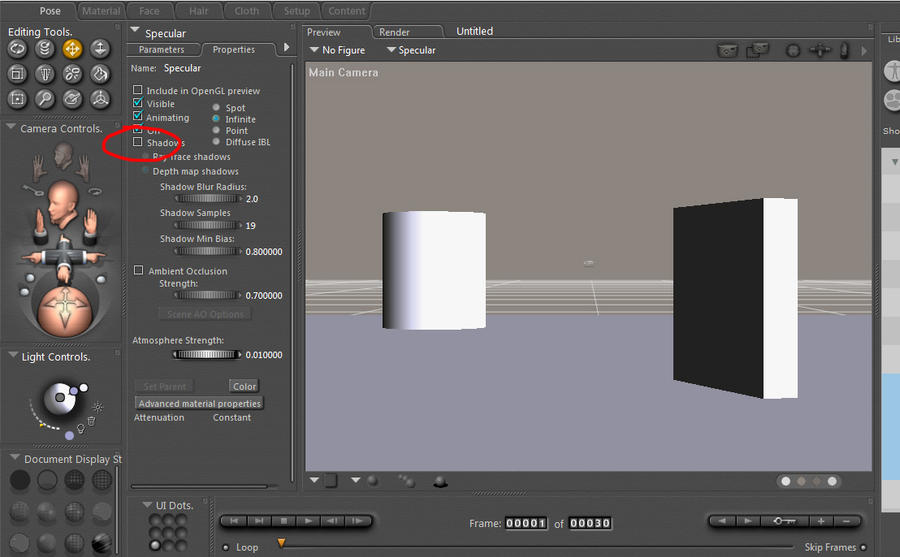
The specular lighting at the moment is being controlled by your infinte/sun light so to turn this off you need to go into the Material room and turn the specular colour to Black.

After creating a new Light, set it as an infinite light with shadows unticked. We dont want this light casting any shadow. You can also set this light to a different colour to your sun light. Again this is another thing you can control better now the light is seperated from the sun light.

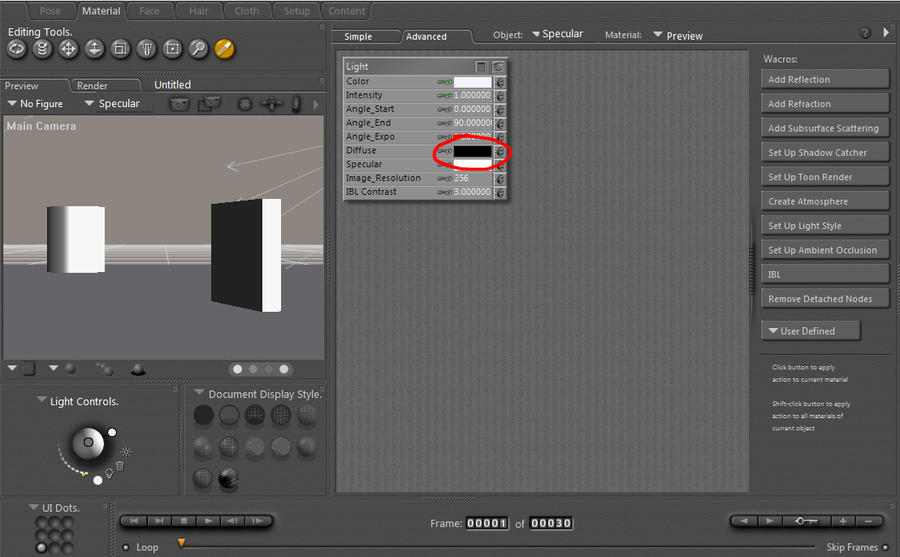
Remember this specular light will not be adding extra light to you scene so we need to enter the material room again and turn the "Diffuse colour" of this light to black. This will ensure this light only outputs specular light that will react to an objects specular value.

To easily Identify your lights name your "Specular" and "Infinite/Sun" lights accordingly. Remember you can check you are naming the right ones in your material room.
You now have the basic foundations all in place. This is a good point to save your light as using this light as a starting point will save you some time in the future. To save this light select the Light folder in your library and after locating a folder you are happy to save your lights to click the "add to library" option followed by the name of the light and the "single frame" option.
Step 4: Customise
Now you have the foundations set you can go to town on customisation and experiment to your hearts content.
Here are a few extra points that will help you get the most of your experiments.
1. Ambient Occlusion.
I mentioned this earlier as it was an option we selected on the IBL light. Ambient Occlusion is a method used to add extra depth to your rendering. It simulates an occurance which happens with real life light to add extra shadows in areas where objects meet or come in close proximity to each other. Ambient occlusion appears even in shaded areas where there is no direct light.
The two images below show the pillar rendered with Ambient Occlusion and without.

I will write a whole tutorial on how to refine your ambient occlusion settings as the subject can be quite detailed. The only other main point you need to know right now is that ambient occlusion can be cast through your light or applied directly to an objects surface material. It is worth noting that using both of these methods at the same time usually gives horrible results so if you experience odd marks appering in your scene try turning the AO in the light off as the object you are rendering probably has AO in its surface material.
2.IBL light
IBL means "Image based Light" and generally is used in conjunction with an HDR light probe. The IBL light can be used as I have shown here without an image or you can use an HDR light probe or even just a Jpeg image to customise your light. Note that using an Image applied to the IBL will make it darker so you may need to alter your intensity again.
Here is how you apply an image.
Select your IBL light and then enter the Material room.
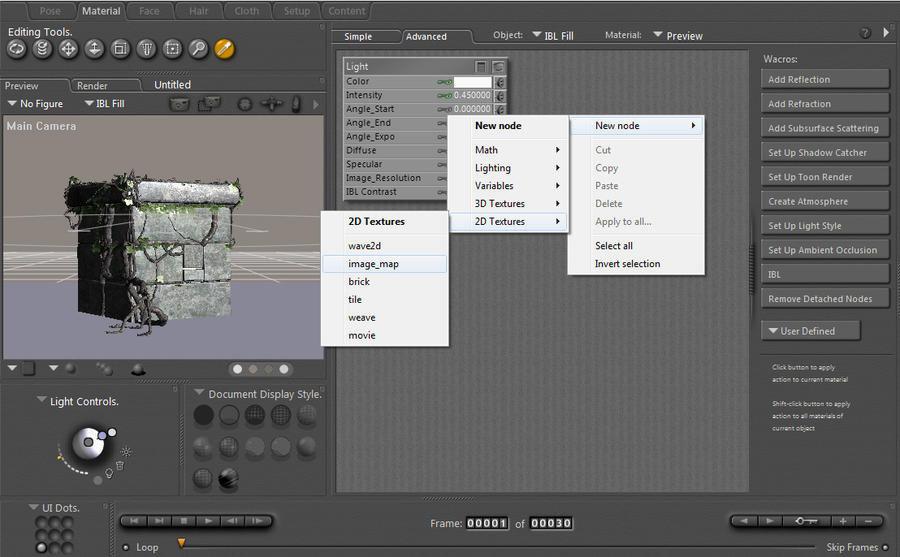
Once there right click in the clear area and select:
New Node>2D Textures>Image Map.

Now on the new Image map node select the image source. This will give you a browse option for you to find the image on your hard drive. Poser comes with several HDR probes located in the textures folder of the runtime(IBL probes come with poser 7 and up).
Once you have located the probe you can attach the node in the way shown below. As mention earlier you can apply any image here but generally HDR probes work best.

The overall colour of the probe will be more visible in the shaded areas of your image as the direct light from your Infinite/sun light is still white(you can change that to match if you wish).
Using images in your light can be useful to set a certain mood or to give a scene a different look. Using orange can imply an early morning setting or be used in a feiry cave etc. It all depends on your scene.

I hope this tutorial has been useful and will have you creating your own unique lights in no time. Please remember that you may have to tweak certain areas such as light intensity to get the best results out of different characters and objects as different material shaders react differently to light.
If you need any more help or have been experiencing problems that aren't covered here contact me on DeviantArt.com
The render settings I use for final renders are as follows.

There are many ways in which to set up your lights which will all deliver different results but these are the steps I take when setting up a new light set.
Step 1:
IBL(Diffuse Light)
Start a new scene in Poser and delete all of the existing lights. You can do this one by one by selecting the light and then clicking the "Dustbin/Delete" button on the light panel.
Next use the "Create Light" icon to create a new light. This Light will be your IBL Diffuse light so in the Parameters/Properties panel click "Diffuse IBL". (I have also selected Ambient Occlusion But I will explain that later)
I always try and think of the IBL light as a shadow filler. For example any area in your image that is in shadow will be "filled" by Diffuse Light. (I will show this after adding the Infinite light.) For this reason I usually knock the IBL Intensity down to around 50% or less.
To easily Identify each light name this Light "IBL Fill" by clicking the name "Light 1" in your "Properties" pane.
Step 2: Infinite/ Sun Light
The next step is to create a new light and tick the button to assign it as an "Infinite" light.
Select Shadows and tick the Raytrace Shadows box. Raytrace shadows work more accurately than Depth map and in my opinion give better results overall. You can change the sharpness of the shadows here by altering the "Shadow Blur Radius" dial. I usually choose something between 0.0 and 2.0 but it is worth experimenting to fit with your scene.
For Raytrace shadows to work you must have raytrace ticked in your render settings. I will post an image of my final render settings at the end of the tutorial.
Here is the image rendered with the Infinite/Sun light added. The Infinite light works very simmilar to real life sun light. It is directional but it fills an infinite area so even if your object is way back in the distance light will be cast onto it from the Infinite light. You can see in the picture the IBL light is illuminating the shaded areas so they are not black.
Step 3: Refinement
At this point you have a pretty basic IBL based light set with all of the elements required for illuminating a scene.
You can decide now whether your IBL light is filling the shadows the amount you intend. You can alter the intensity to a point which suits you best. This also applys to the brightness of your Infinite light. If the illuminated areas are too bright and blown out decrease your Intensity slightly until you are happy with the results.
Now I usually add another Infinite Light to the scene that will be used to cast specular light. Specular light will give shine to objects and having a seperate light for this task gives you more control.
The specular lighting at the moment is being controlled by your infinte/sun light so to turn this off you need to go into the Material room and turn the specular colour to Black.

After creating a new Light, set it as an infinite light with shadows unticked. We dont want this light casting any shadow. You can also set this light to a different colour to your sun light. Again this is another thing you can control better now the light is seperated from the sun light.
Remember this specular light will not be adding extra light to you scene so we need to enter the material room again and turn the "Diffuse colour" of this light to black. This will ensure this light only outputs specular light that will react to an objects specular value.
To easily Identify your lights name your "Specular" and "Infinite/Sun" lights accordingly. Remember you can check you are naming the right ones in your material room.
You now have the basic foundations all in place. This is a good point to save your light as using this light as a starting point will save you some time in the future. To save this light select the Light folder in your library and after locating a folder you are happy to save your lights to click the "add to library" option followed by the name of the light and the "single frame" option.
Step 4: Customise
Now you have the foundations set you can go to town on customisation and experiment to your hearts content.
Here are a few extra points that will help you get the most of your experiments.
1. Ambient Occlusion.
I mentioned this earlier as it was an option we selected on the IBL light. Ambient Occlusion is a method used to add extra depth to your rendering. It simulates an occurance which happens with real life light to add extra shadows in areas where objects meet or come in close proximity to each other. Ambient occlusion appears even in shaded areas where there is no direct light.
The two images below show the pillar rendered with Ambient Occlusion and without.
I will write a whole tutorial on how to refine your ambient occlusion settings as the subject can be quite detailed. The only other main point you need to know right now is that ambient occlusion can be cast through your light or applied directly to an objects surface material. It is worth noting that using both of these methods at the same time usually gives horrible results so if you experience odd marks appering in your scene try turning the AO in the light off as the object you are rendering probably has AO in its surface material.
2.IBL light
IBL means "Image based Light" and generally is used in conjunction with an HDR light probe. The IBL light can be used as I have shown here without an image or you can use an HDR light probe or even just a Jpeg image to customise your light. Note that using an Image applied to the IBL will make it darker so you may need to alter your intensity again.
Here is how you apply an image.
Select your IBL light and then enter the Material room.
Once there right click in the clear area and select:
New Node>2D Textures>Image Map.
Now on the new Image map node select the image source. This will give you a browse option for you to find the image on your hard drive. Poser comes with several HDR probes located in the textures folder of the runtime(IBL probes come with poser 7 and up).
Once you have located the probe you can attach the node in the way shown below. As mention earlier you can apply any image here but generally HDR probes work best.

The overall colour of the probe will be more visible in the shaded areas of your image as the direct light from your Infinite/sun light is still white(you can change that to match if you wish).
Using images in your light can be useful to set a certain mood or to give a scene a different look. Using orange can imply an early morning setting or be used in a feiry cave etc. It all depends on your scene.

I hope this tutorial has been useful and will have you creating your own unique lights in no time. Please remember that you may have to tweak certain areas such as light intensity to get the best results out of different characters and objects as different material shaders react differently to light.
If you need any more help or have been experiencing problems that aren't covered here contact me on DeviantArt.com
The render settings I use for final renders are as follows.
Subscribe to:
Posts (Atom)