I touched upon the use of Ambient Occlusion in my last tutorial on Lighting. With this next tutorial I will go into some more detail and explain the different ways to use ambient occlusion within Poser.
Before you start please be aware that any numeric values I give in this tutorial be measured in "Feet". To check your unit type in Poser go to Edit>General Preferences then on the "Interface" tab select "Feet" as your Display Units.
What is Ambient Occlusion?
Basically Ambient Occlusion is a method of shading 3D objects in a way that more realistically resembles real life ambient light.
The results of Ambient Occlusion were shown in my Lighting tutorial so I will start off explaining how to set up the different ways to use Ambient Occlusion in Poser.
I suggest following the tutorial on light so you have a ready made IBL light ready for this tutorial as well as my render settings.
NOTE: It is worth mentioning that in Poser 8 and Poser pro 2010 the use of Ambient occlusion with IDL turned on in render setting is not a good idea. There will be some horrible effects and render times will be way too long.
I will be writing a tutorial on IDL in the future
Method 1-Lighting.
In poser you can choose to have Ambient Occlusion cast from your lighting set up. This method is the easiest and quickest way to apply AO(Ambient Occlusion). If you would like more control over your use of Ambient Occlusion you can follow Method 2 for setting up AO on individual materials.
You can apply AO to any light in your scene but I feel the best results come from applying it to your IBL light.(If you are not using IBL then obviously apply it to another light or use the second method)
The below image shows AO used with IBL and Infinite light. The results are dramatically different..

To set up AO on your lighting you only have to click the tick button named "Ambient Occlusion" on the "Properties" panel of the selected light. (In this case IBLFill)
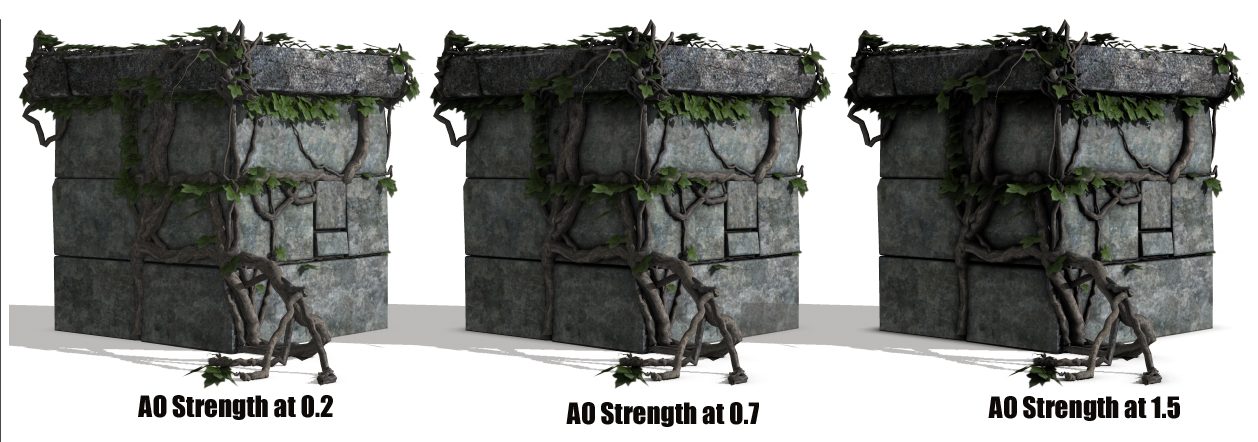
You can alter the Strength of you AO effect using the "Strength" slider.
The below images show AO at default 0.700 as well as 0.200 and 1.500
You can change AO settings if you want by clicking the "Scene AO Options" Button just under the Strength slider.
Usually the default setting are fine and using the Strength slider will meet most of your needs for AO preference; However Changing the settings can be useful to speed up render times or clean up rough looking AO patches.
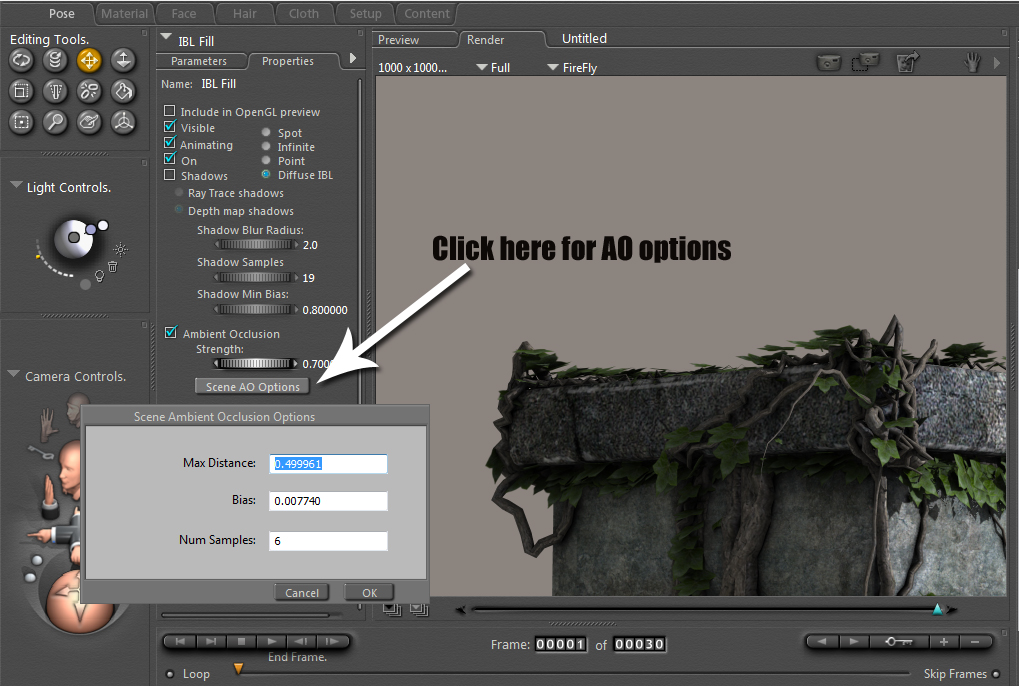
AO settings.
Ambient Occlusion works on a use of "Rays" simmilar to sun rays. As the light reflects off an object Poser Calculates the distance a ray travels before it comes into contact with another surface. The distance between these surfaces determines the darkness of the AO effect e.g. If two surfaces are touching like the vines on the wall here then the darkness will be at its maximum.
Max Distance.
You can alter the distance a ray travels using the Max Distance option. This in effect alters the darkness of the AO and has basically the same effect as the Strength Slider by increasing or decreasing the spread of the AO. I have witnessed no noticable change in render times when altering the Max Distance.
Ray Bias.
Ray Bias Will Alter the minimum distance a ray has to travel before showing the effect of AO. You will want this set to the lowest possible setting before you start getting blotchy shading.
You should only really need to alter this if you are getting blotchy shading. This problem occurs when the AO effect is being applied too soon after the light has reflected.
Pixel Samples
This setting affects the quality of the AO effect. The higher the number the better the quality. This setting DOES effect render times.
So if you feel your render times are extensive try lowering your pixel samples. This will affect the quality but it may be such a small amount you may not notice. If you feel the edges of your AO shading is a little crisp or rough you can up the pixel sample to smooth it out.
Method 2-Material Ambient Occlusion
Another method of applying AO to your renders is to apply it to your materials. This method allows greater control over your AO use and can be used to apply different amounts of AO to different materials as well as have materials with no AO at all.
With materials that contain transparency, for instance hair, Poser will take longer to calculate AO casting. Sometimes this may be TOO long and alot of the time you may feel the render time isn't worth the final result.
To apply AO in your material you need to add an Ambient Occlusion Node to you selected material. To do this enter the material room using the tabs along the top of your screen.
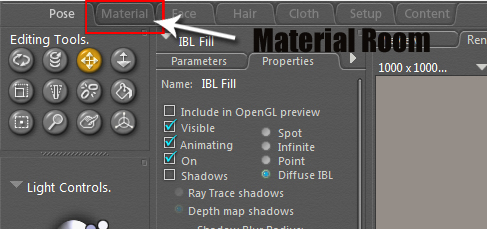
Once in the material room select the material you want to apply AO to using the drop down menus above the material window.
Now there is an easy way to apply AO and all you need to do is use the "Add AO Node" Wacro button at the right hand side of your material window. (This may be hidden and you may need to click the unhide tab to show it)
Once the Wacro button is clicked Poser will automatically connect an AO node to your material. You can now alter the effect of that AO node in the same way explain in the "AO Scene Options" above You have the same parameters that effect the AO in the same way.
#Of course you can create your own AO set up by right clicking in the material window and finding the Ambient Occlusion node. You will then have to attach the wires yourself. Once you get confident with using material room nodes you can start experimenting with you AO node arrangement. You may find more subtle or extreme uses for AO.#
Obviously this method of setting up AO for each material is more time consuming to set up but during rendering it may save you alot of time, especially if you only apply AO to objects that really need it. It will also allow for different levels of AO so if you want your characters skin to have a softer AO effect than their clothing or surrounding props that is possible.
Thank you for reading and I hope you have found this tutorial useful.
The following image was rendered using the light created in my last tutorial and I set up the AO in the material room with different AO settings for individual materials.

Thank you so much for sharing your knowledge with us my friend
ReplyDelete