There are many ways in which to set up your lights which will all deliver different results but these are the steps I take when setting up a new light set.
Step 1:
IBL(Diffuse Light)
Start a new scene in Poser and delete all of the existing lights. You can do this one by one by selecting the light and then clicking the "Dustbin/Delete" button on the light panel.
Next use the "Create Light" icon to create a new light. This Light will be your IBL Diffuse light so in the Parameters/Properties panel click "Diffuse IBL". (I have also selected Ambient Occlusion But I will explain that later)
I always try and think of the IBL light as a shadow filler. For example any area in your image that is in shadow will be "filled" by Diffuse Light. (I will show this after adding the Infinite light.) For this reason I usually knock the IBL Intensity down to around 50% or less.
To easily Identify each light name this Light "IBL Fill" by clicking the name "Light 1" in your "Properties" pane.
Step 2: Infinite/ Sun Light
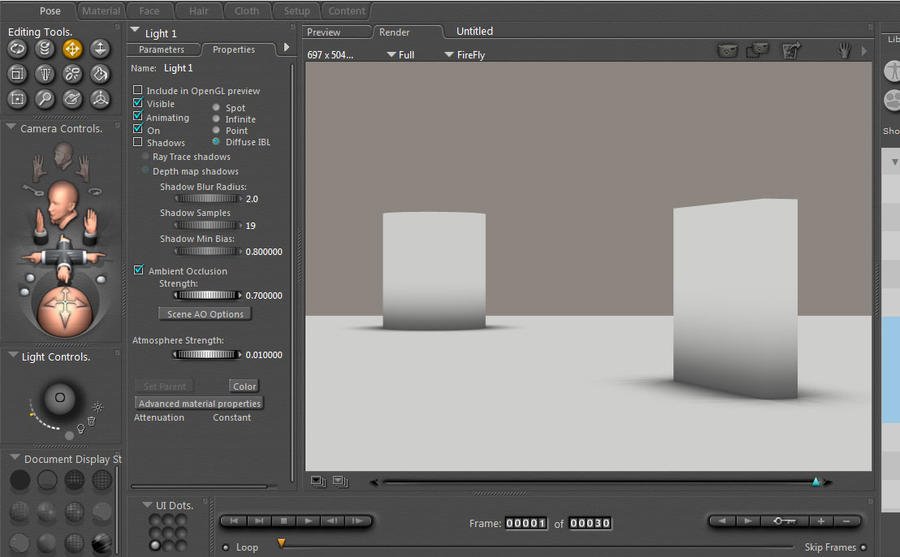
The next step is to create a new light and tick the button to assign it as an "Infinite" light.
Select Shadows and tick the Raytrace Shadows box. Raytrace shadows work more accurately than Depth map and in my opinion give better results overall. You can change the sharpness of the shadows here by altering the "Shadow Blur Radius" dial. I usually choose something between 0.0 and 2.0 but it is worth experimenting to fit with your scene.
For Raytrace shadows to work you must have raytrace ticked in your render settings. I will post an image of my final render settings at the end of the tutorial.
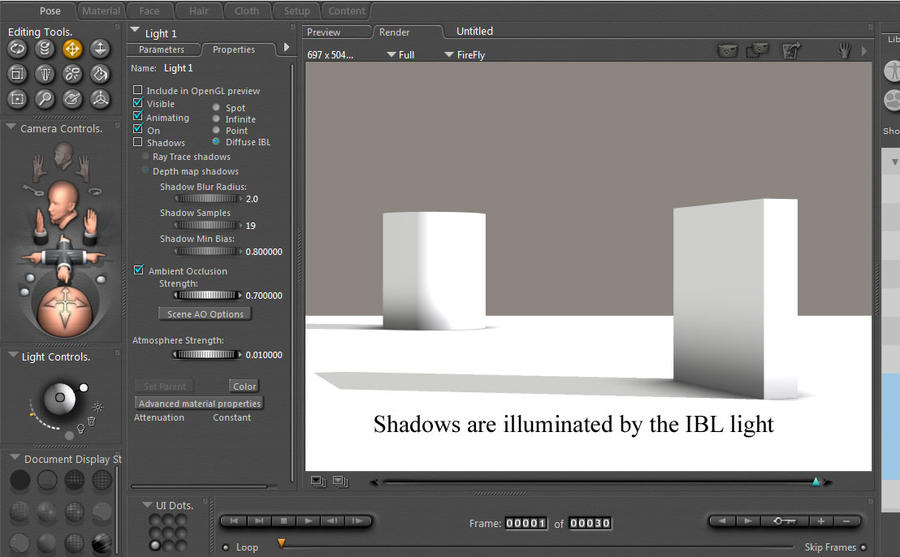
Here is the image rendered with the Infinite/Sun light added. The Infinite light works very simmilar to real life sun light. It is directional but it fills an infinite area so even if your object is way back in the distance light will be cast onto it from the Infinite light. You can see in the picture the IBL light is illuminating the shaded areas so they are not black.
Step 3: Refinement
At this point you have a pretty basic IBL based light set with all of the elements required for illuminating a scene.
You can decide now whether your IBL light is filling the shadows the amount you intend. You can alter the intensity to a point which suits you best. This also applys to the brightness of your Infinite light. If the illuminated areas are too bright and blown out decrease your Intensity slightly until you are happy with the results.
Now I usually add another Infinite Light to the scene that will be used to cast specular light. Specular light will give shine to objects and having a seperate light for this task gives you more control.
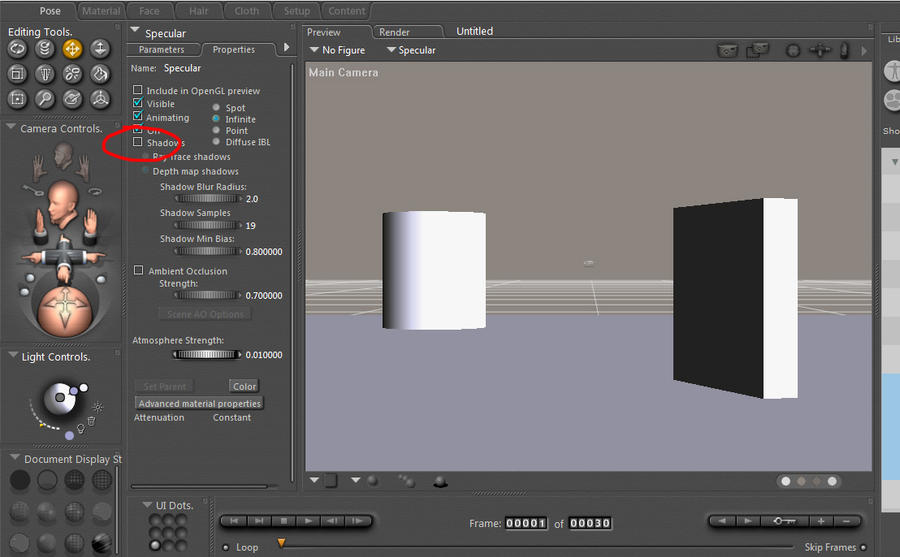
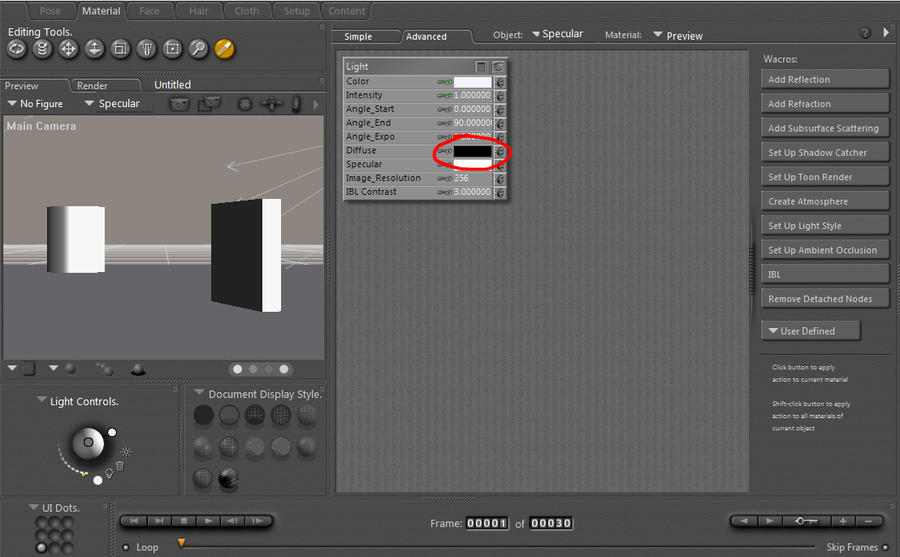
The specular lighting at the moment is being controlled by your infinte/sun light so to turn this off you need to go into the Material room and turn the specular colour to Black.

After creating a new Light, set it as an infinite light with shadows unticked. We dont want this light casting any shadow. You can also set this light to a different colour to your sun light. Again this is another thing you can control better now the light is seperated from the sun light.
Remember this specular light will not be adding extra light to you scene so we need to enter the material room again and turn the "Diffuse colour" of this light to black. This will ensure this light only outputs specular light that will react to an objects specular value.
To easily Identify your lights name your "Specular" and "Infinite/Sun" lights accordingly. Remember you can check you are naming the right ones in your material room.
You now have the basic foundations all in place. This is a good point to save your light as using this light as a starting point will save you some time in the future. To save this light select the Light folder in your library and after locating a folder you are happy to save your lights to click the "add to library" option followed by the name of the light and the "single frame" option.
Step 4: Customise
Now you have the foundations set you can go to town on customisation and experiment to your hearts content.
Here are a few extra points that will help you get the most of your experiments.
1. Ambient Occlusion.
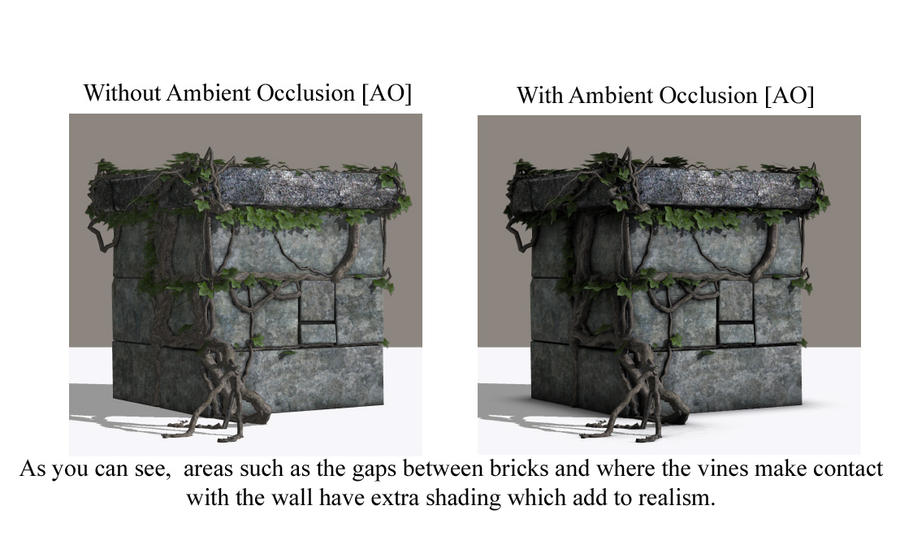
I mentioned this earlier as it was an option we selected on the IBL light. Ambient Occlusion is a method used to add extra depth to your rendering. It simulates an occurance which happens with real life light to add extra shadows in areas where objects meet or come in close proximity to each other. Ambient occlusion appears even in shaded areas where there is no direct light.
The two images below show the pillar rendered with Ambient Occlusion and without.
I will write a whole tutorial on how to refine your ambient occlusion settings as the subject can be quite detailed. The only other main point you need to know right now is that ambient occlusion can be cast through your light or applied directly to an objects surface material. It is worth noting that using both of these methods at the same time usually gives horrible results so if you experience odd marks appering in your scene try turning the AO in the light off as the object you are rendering probably has AO in its surface material.
2.IBL light
IBL means "Image based Light" and generally is used in conjunction with an HDR light probe. The IBL light can be used as I have shown here without an image or you can use an HDR light probe or even just a Jpeg image to customise your light. Note that using an Image applied to the IBL will make it darker so you may need to alter your intensity again.
Here is how you apply an image.
Select your IBL light and then enter the Material room.
Once there right click in the clear area and select:
New Node>2D Textures>Image Map.
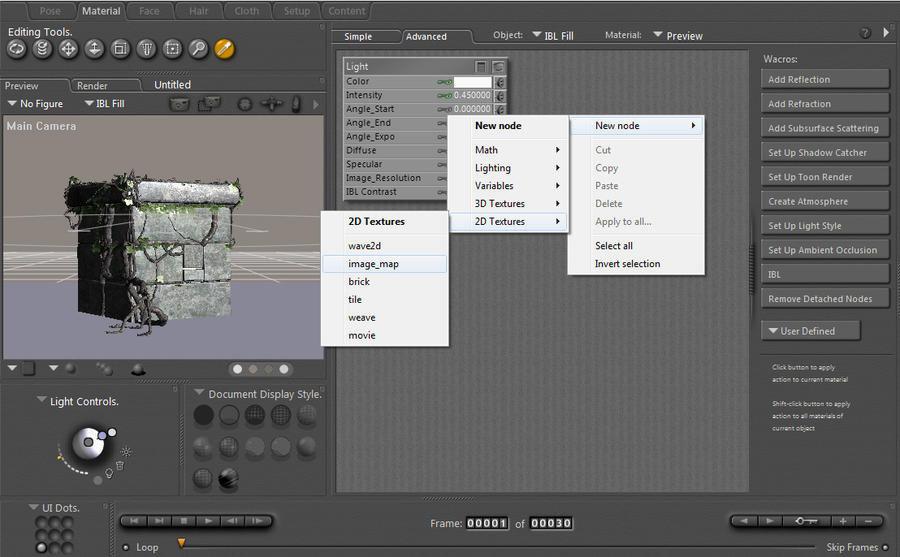
Now on the new Image map node select the image source. This will give you a browse option for you to find the image on your hard drive. Poser comes with several HDR probes located in the textures folder of the runtime(IBL probes come with poser 7 and up).
Once you have located the probe you can attach the node in the way shown below. As mention earlier you can apply any image here but generally HDR probes work best.

The overall colour of the probe will be more visible in the shaded areas of your image as the direct light from your Infinite/sun light is still white(you can change that to match if you wish).
Using images in your light can be useful to set a certain mood or to give a scene a different look. Using orange can imply an early morning setting or be used in a feiry cave etc. It all depends on your scene.

I hope this tutorial has been useful and will have you creating your own unique lights in no time. Please remember that you may have to tweak certain areas such as light intensity to get the best results out of different characters and objects as different material shaders react differently to light.
If you need any more help or have been experiencing problems that aren't covered here contact me on DeviantArt.com
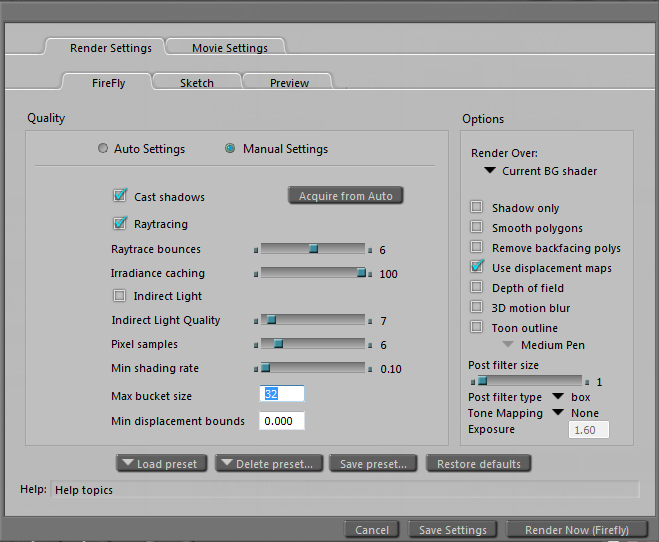
The render settings I use for final renders are as follows.
THANK YOU!
ReplyDeleteHonestly, I was tearing my hair out.
I bought Poser Debut and managed to render some OK ivy vine textures using the default IBL and light sets with some tweaking and messing with the render settings.
I found initially even though the render looked OK in Poser when I exported it as a PNG the leaves were blurred and semi transparent in Photoshop so I kind of "fixed" the issue by duplicating the layers....anyway I bought Poser 8 and tried to create some more but no matter which let set I used or tweaked with and no matter what I ticked and unticked in the render settings they all came out like crap.
It was driving me mad as it takes 20 mins for a render even on a low resolution before I could check to see they came out OK and they didnt.
I looked for tutorials and there was very little in the way of natural daylight for plant and nature scenes that wasnt "advanced"
I have just followed your tutorial, made my own 2 lights ( I didnt add the specular as they are leaves and I didnt think a shine would be good) and am rendering some now and at last the veins in the leaves are visible and the edges of them look crisp, there are no dark shadows within the leaves (the dark areas previously were the real problem and so I turned off shadows! lol)
I am hoping at last that I am at least half way to creating a suitable light set for leaves and plants!
Many thanks - honestly!
Liz Gallagher
TRU Textures
PS -
ReplyDeleteIf you have any light sets that you feel would work well for plant renders please display the URL and I will purchase them.
I will only use Poser for plant renders I suspect I am in the game graphics industry and whilst I am new to Poser (and 3D) I suspect its not the correct program for making tiling textures either procedural or organic ones from photos.
Sorry lol but I just had to come back and say thanks again.. they have rendered so beautifully and I had given up 3 days ago after 6 hours of ugly renders...
ReplyDeleteIts taking about 30 minutes to render the smallest default resolution though and I will need at least 1024 pixels so I expect that size will be an hour!
I have 16 gig of RAM on an iMac - perhaps its those AO settings you mentioned (?)
I dont really care TBH I am just so thankful to you - can you tell? LOL
Wonderful tutorial and thanks for sharing your knowledge!
ReplyDelete@Elisabeth: I have an imac with 4 GB ram, takes me about 12-13 minutes to render a 1500x1200 scene @ 300 dpi with 2 characters (M4-V4) fully clothed, with a relatively complex mesh for a background and 1 infinite and 2 IBL lights. Perhaps lowering the amount of lights and the shadow map dial to 256-300 will lower your render time also. It's way too much render time for the specs of your machine!
@Elizabeth.. Sorry for the massively late reply. I didn't get any notice of your coments :(
ReplyDeleteI am very glad you found the tutorial helpful and I hope since leaving these comments you have figured out reducing your render times.
If not there could be a few reasons for slow renders. Most common reasons is having AO on both the light and the materials in your scene. Also if you are rendering plants that usually means transparency maps which will increase render time.
Indispensable tutorial, thanks!
ReplyDelete